How to Enable the Legacy Advanced Boot Option in Windows 10
The Legacy Advanced Boot Option in Windows 10 is a powerful feature that allows users to access various troubleshooting and recovery tools before the operating system fully loads. This can be particularly useful for diagnosing and fixing issues that typically prevent Windows from starting. Enabling this option provides access to tools such as Safe Mode, Command Prompt, and System Restore, which can be crucial in resolving critical system problems.
Table of Contents
Step-by-Step Guide
Method 1 : Restarting Your Windows 10 PC
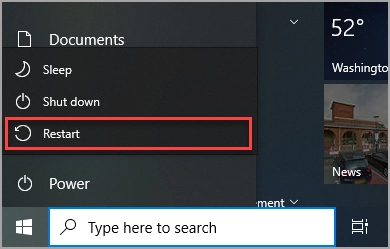
Click on the Start Menu:
- Click the Windows icon in the bottom-left corner of your screen or press the
Windowskey on your keyboard.
Open the Power Menu:
- In the Start menu, click on the Power icon. It looks like a small circle with a vertical line through the top.
Select Restart:
- From the Power menu options, select Restart. Your computer will close all running applications and restart.
Method 2 : Entering BIOS Setup and Configuring Your PC to Boot from CD/DVD
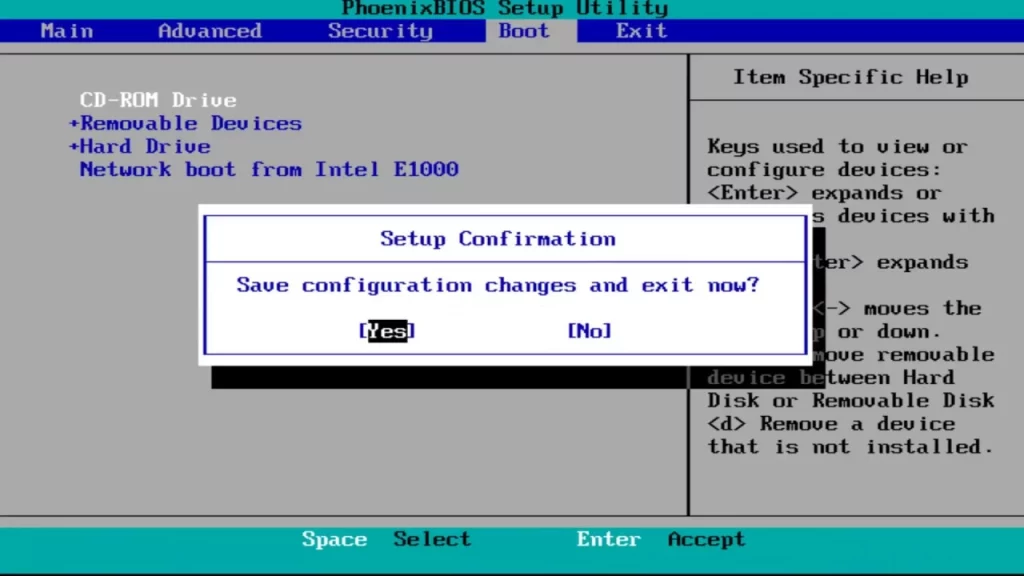
Watch for the Setup Key Prompt:
- As your computer restarts, you’ll see a prompt on the screen indicating which key to press to enter BIOS setup. This key varies depending on the manufacturer of your motherboard or laptop. Standard keys include F2, F10, F12, Delete, or Esc.
- Tip: If the prompt disappears too quickly, you can try restarting your computer again.
Press the Setup Key:
- Immediately press the specified key repeatedly as your computer starts up. This will take you to the BIOS setup screen.
Step 1 : Navigate the BIOS Setup
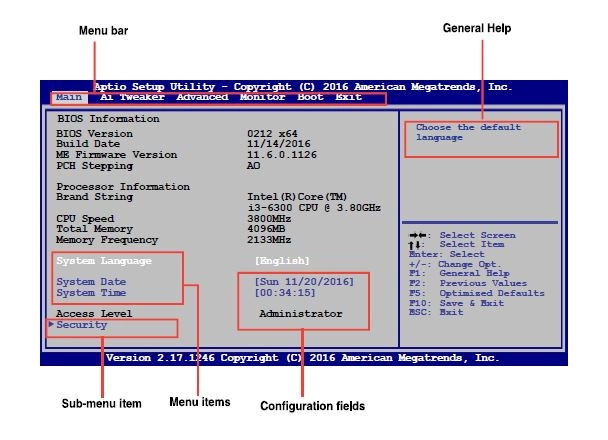
- Use the Arrow Keys:
- The BIOS setup interface typically does not support the mouse, so you’ll need to use the arrow keys on your keyboard to navigate.
- Navigate to the Boot tab or Boot Menu. The exact name may vary depending on your BIOS version.
- Find the Boot Order Settings:
- Look for an option called Boot Order, Boot Sequence, or something similar. This section allows you to prioritize the boot devices.
Step 2 : Change the Boot Order
- Select the CD/DVD Drive:
- Use the arrow keys to highlight the CD/DVD drive in the boot order list.
- Move the CD/DVD Drive to the Top:
- Follow the on-screen instructions to move the CD/DVD drive to the top of the boot order list. This is usually done by pressing the + or – keys, or sometimes F5 or F6.
- Ensure that the CD/DVD drive is the first boot option.
Step 3 : Save and Exit BIOS
- Save the Changes:
- Once you have set the CD/DVD drive as the first boot option, look for the option to save your changes and exit the BIOS. This is usually listed as Save & Exit or something similar.
- Press the corresponding key (often F10) to save the changes.
- Confirm the Changes:
- You may be prompted to confirm your changes. Select Yes or OK to proceed.
- Exit the BIOS Setup:
- Your computer will restart with the new boot order. If there is a bootable CD/DVD in the drive, the system will boot from it.
Additional Tips
- Keep Your CD/DVD Ready: Ensure the bootable CD/DVD is inserted into the drive before restarting your computer.
- Manufacturer-Specific Instructions: If you need clarification on your computer’s BIOS key, refer to the manufacturer’s manual or support website for specific instructions.
- UEFI vs. Legacy BIOS: Some modern systems use UEFI firmware instead of the traditional BIOS. The process is similar but might have slight differences in the interface and terminology.
Method 3 : Inserting Your Windows 10 Installation or Recovery Media
Inserting your Windows 10 installation or recovery media is crucial in troubleshooting, reinstalling, or recovering your Windows 10 operating system. Here’s a detailed guide on how to properly insert your installation or recovery media:
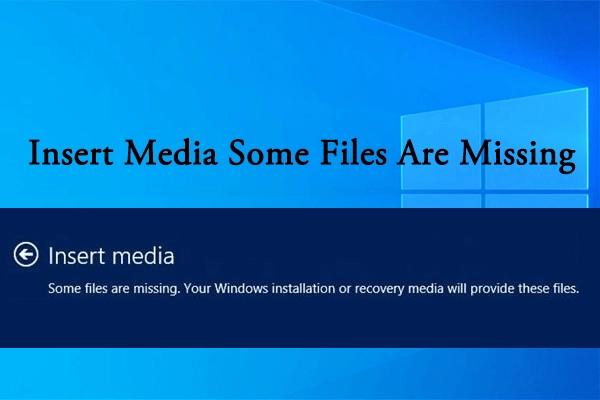
Step 1: Prepare the Installation or Recovery Media
- Obtain the Media:
- Ensure you have a Windows 10 installation or recovery CD/DVD. This can be obtained from Microsoft, a retailer, or created using the Media Creation Tool if you have a valid Windows 10 license.
- If you use a recovery media created by your PC manufacturer, ensure it is compatible with your system.
- Check the Media for Damage:
- Inspect the CD/DVD for any scratches, dust, or other damages that could prevent it from being read correctly.
- If necessary, clean the disc gently with a soft, lint-free cloth, wiping from the center outward.
Step 2: Insert the Media into the CD/DVD Drive
- Open the CD/DVD Drive:
- Press the eject button on the front of your CD/DVD drive. If using an external drive, ensure it is correctly connected to your computer and powered on.
- The drive tray should open automatically.
- Place the Media in the Tray:
- Carefully place the Windows 10 installation or recovery CD/DVD into the tray. Make sure the label side is facing up.
- Align the disc properly in the tray to ensure it sits flat and secure.
- Close the CD/DVD Drive:
- Gently push the drive tray back into the drive or press the eject button again to close it automatically.
- Ensure the drive is fully closed and the disc is properly seated inside.
Step 3: Verify the Media is Recognized
- Listen for Activity:
- After inserting the CD/DVD, you should hear the drive spin up and begin reading the disc. This indicates that the drive is recognizing the media.
- If your drive has an activity light, it should blink or stay on while the disc is being read.
- Check for On-Screen Prompts:
- Depending on your BIOS/UEFI settings and the media, you may see a prompt on the screen indicating that the CD/DVD is being accessed.
- If you have set the CD/DVD drive as the primary boot device, your computer should automatically boot from the media.
Step 4: Troubleshoot If Necessary
- Recheck the Media:
- If the disc is not recognized, open the drive and reinsert the media, ensuring it is correctly aligned in the tray.
- Try cleaning the disc again if it appears dirty or scratched.
- Check the Drive:
- Ensure the CD/DVD drive is connected correctly and functioning. If using an external drive, check the USB connection and power source.
- You can test the drive with another CD/DVD to verify it works correctly.
- Verify BIOS/UEFI Settings:
- Ensure you have correctly set the boot order in the BIOS/UEFI to prioritize the CD/DVD drive.
- If necessary, re-enter the BIOS/UEFI setup (as described in the previous step) to double-check the settings.
Method 4 : Prompted to Press Any Key to Boot from CD or DVD, Press Any Key to Continue
Booting from a CD or DVD is a crucial step when installing or repairing your operating system using installation or recovery media. Once you’ve configured your BIOS settings to boot from the CD/DVD drive and inserted your media, your system will prompt you to press any key to boot from the CD/DVD. Here’s a detailed explanation of this process:
Step 1: Monitor Your Screen During Startup
- Restart Your Computer:
- After inserting the Windows 10 installation or recovery media and configuring the BIOS settings, restart your computer.
- Watch for the Prompt:
- As your computer begins to restart, keep an eye on the screen. You’ll see various boot messages and potentially a logo from your computer’s manufacturer.
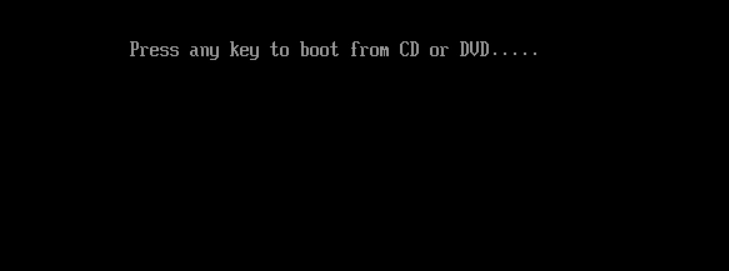
- Look for the prompt that says, “Press any key to boot from CD or DVD…”. This message usually appears for a few seconds during the initial stages of the boot process.
Step 2: Press Any Key to Boot from CD or DVD
- Be Ready:
- The prompt to “Press any key to boot from CD or DVD…” appears for a limited time (usually around 5-10 seconds). Be prepared to press a key as soon as you see this message.
- Press Any Key:
- When the prompt appears, press any key on your keyboard (e.g., Spacebar, Enter, or any letter key). This action tells your computer to start the boot process from the CD/DVD drive instead of the hard drive.
- If you miss the prompt, your computer will attempt to boot from the next device in the boot order, typically the hard drive, and you may need to restart your computer and try again.
Step 3: Booting from the Media
- Begin the Boot Process:
- Once you press a key, the computer will start loading the Windows installation or recovery files from the CD/DVD. You’ll see a message indicating that the setup is starting.
- Loading Files:
- The screen may show a message like “Windows is loading files…”. This process involves copying necessary files from the CD/DVD to the system memory.
- Setup or Recovery Options:
- After loading the files, you’ll see the screen for Windows setup or recovery options. You can install Windows, repair your system, or use other troubleshooting tools here.
Method 5 : Selecting Your Language Preferences and Clicking “Repair Your Computer”
Once you’ve successfully booted from your Windows 10 installation or recovery media, you’ll be guided through several steps to install or repair your operating system. Selecting your language preferences and accessing the repair options are crucial steps. Here’s a detailed guide on how to do this:
Step 1: Boot from the Installation or Recovery Media
- Restart Your Computer:
- After inserting the Windows 10 installation or recovery media and configuring the BIOS settings, restart your computer.
- Press Any Key:
- When prompted with “Press any key to boot from CD or DVD…” press any key on your keyboard to initiate the boot process from the media.
Step 2: Loading the Windows Setup
- Wait for Setup to Load:
- After pressing a key, the Windows setup will begin loading files. This may take a few moments. You’ll see a message indicating that Windows is loading files, followed by a logo.
Step 3: Select Language Preferences
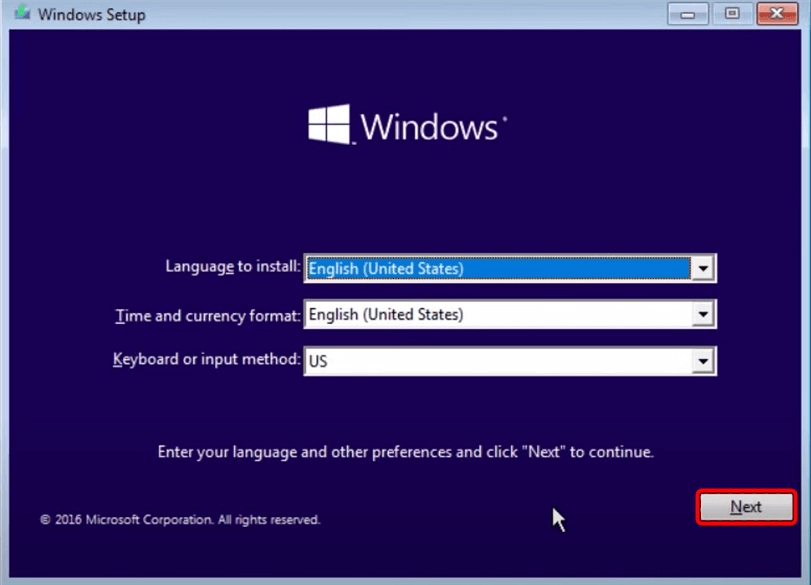
- Language to Install:
- You will see a “Windows Setup” screen with several drop-down menus.
- Select your preferred language in the “Language to install” drop-down menu. For example, select “English (United States)” if you prefer English.
- Time and Currency Format:
- In the “Time and currency format” drop-down menu, select the format corresponding to your region. For example, select “English (United States)” for the U.S. format.
- Keyboard or Input Method:
- Select the keyboard layout in the “Keyboard or input method” drop-down menu. For example, select “U.S.” for the standard U.S. keyboard layout.
- Click Next:
- After selecting your preferences, click the Next button at the bottom of the screen to proceed.
Step 4: Access Repair Options
- Windows Setup Screen:
- After clicking Next, you’ll be taken to a screen with two main options: Install now and Repair your computer.
- Click Repair Your Computer:
- Click on the Repair your computer link in the window’s bottom-left corner. This option takes you to the advanced troubleshooting tools rather than proceeding with a fresh installation of Windows.
Step 5: Choose an Option Screen
- Advanced Startup Options:
- After clicking “Repair your computer,” you will be directed to the “Choose an option” screen. This screen offers various options for troubleshooting and repairing your system.
- Select Troubleshoot:
- On the “Choose an option” screen, click on Troubleshoot. This option will open the troubleshooting and recovery tools.
- Advanced Options:
- In the Troubleshoot menu, select Advanced options. This will provide you with various advanced tools such as System Restore, Startup Repair, Command Prompt, and more.
Method 6 : Choosing “Troubleshoot” on the “Choose an option” Screen
Step 1: Access the “Choose an option” Screen
- Boot from Installation or Recovery Media:
- Insert your Windows 10 installation or recovery CD/DVD and restart your computer.
- Press any key when prompted to boot from the CD/DVD.
- Select Language Preferences:
- Choose your language, time and currency format, and keyboard layout. Click Next.
- Click Repair Your Computer:
- On the Windows Setup screen, click on Repair your computer in the bottom-left corner.
Step 2: Navigate to the “Choose an option” Screen
- Wait for the Screen to Load:
- After clicking “Repair your computer,” you will be taken to the “Choose an option” Screen. This may take a few moments to load, so be patient.
- Understand the Available Options:
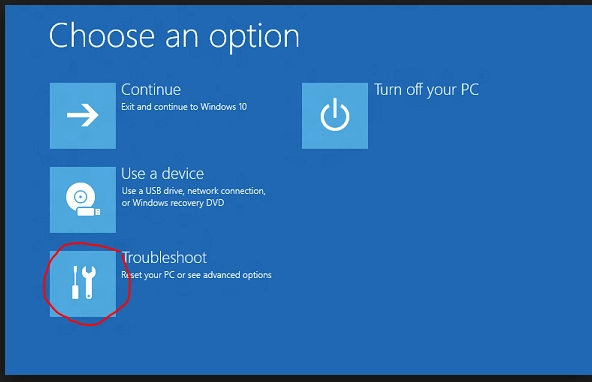
- The “Choose an option” Screen typically presents you with several options, including continuing (to exit to Windows 10), Using a device (to boot from a USB drive, network, etc.), troubleshooting, and Turning off your PC.
Step 3: Select the “Troubleshoot” Option
- Highlight Troubleshoot:
- Use the arrow keys on your keyboard or mouse to select the Troubleshoot option. This option is usually represented by a wrench and screwdriver icon.
- Click on Troubleshoot:
- Click on Troubleshoot to proceed. This will take you to a menu with various advanced troubleshooting and repair tools.
Step 4: Explore the Troubleshoot Menu
- Overview of Troubleshoot Menu:
- The Troubleshoot menu provides two main categories: Reset this PC and Advanced options.
- Reset this PC:
- This option lets you reset your computer to its original state, keeping your files or removing everything. It is helpful if you want to start fresh without reinstalling Windows manually.
- Advanced options:
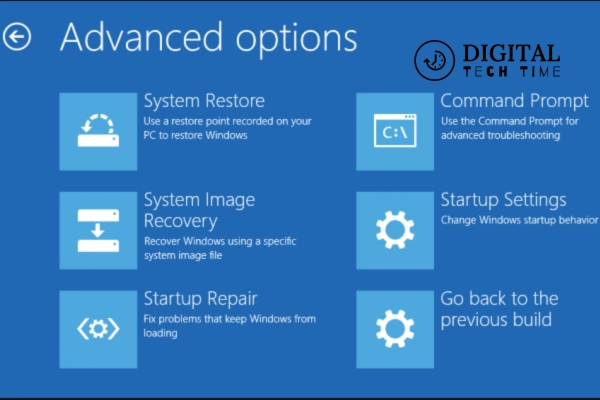
- Click on Advanced Options to access a set of advanced troubleshooting tools. These tools include:
- System Restore: Restores your system to a previous state using a restore point.
- System Image Recovery: You can recover Windows using a system image file.
- Startup Repair: Fixes problems that prevent Windows from starting.
- Command Prompt: Opens a command line interface for advanced troubleshooting.
- Startup Settings: You can change startup behavior by enabling Safe Mode.
- Uninstall Updates: Removes recent updates that might be causing issues.
- Click on Advanced Options to access a set of advanced troubleshooting tools. These tools include:
Method 7 : Choosing “Advanced options” on the “Troubleshoot” Screen
Step 1: Access the “Troubleshoot” Screen
- Boot from Installation or Recovery Media:
- Insert your Windows 10 installation or recovery CD/DVD and restart your computer.
- Press any key when prompted to boot from the CD/DVD.
- Select Language Preferences:
- Choose your language, time and currency format, and keyboard layout. Click Next.
- Click Repair Your Computer:
- On the Windows Setup screen, click on Repair your computer in the bottom-left corner.
- Choose Troubleshoot:
- Click Troubleshoot on the “Choose an option” Screen to access the troubleshooting options.
Step 2: Navigate to the “Advanced options” Screen
Click on Advanced options:
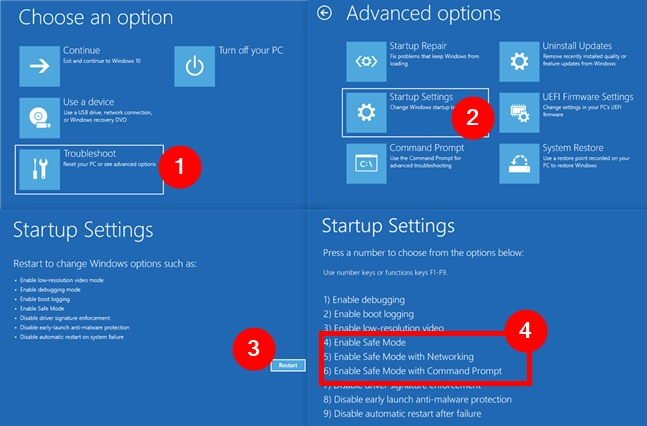
- You will see two main options on the Troubleshoot screen: Reset this PC and Advanced. Click on Advanced Options to access a variety of advanced troubleshooting tools.
Step 3: Explore the Advanced Options
- Overview of Advanced Options:
- The Advanced Options menu provides several tools that can help you diagnose and fix system issues. These include:
- System Restore:
- Allows you to restore your computer to a previous state using a restore point. This is useful if a recent change or update has caused problems.
- System Image Recovery:
- It lets you restore your computer using a previously created system image. This is helpful if you have a complete backup of your System.
- Startup Repair:
- Automatically fixes problems that prevent Windows from starting correctly. This is useful for resolving boot issues.
- Command Prompt:
- Opens a command line interface for advanced troubleshooting. You can use various commands to diagnose and fix issues.
- Startup Settings:
- Allows you to change startup behavior, such as enabling Safe Mode, disabling driver signature enforcement, and more.
- Uninstall Updates:
- It provides options to remove recent updates, including the latest quality or feature updates, that may be causing issues.
- Selecting a Tool:
- Click on the tool you need to use. For example, click System Restore to start the System restore process or Command Prompt to open a command line window.
Step 4: Using Each Advanced Option
- System Restore:
- Click on System Restore. Follow the on-screen instructions to choose a restore point and restore your System to a previous state. This can help undo recent changes that caused issues.
- System Image Recovery:
- Click on System Image Recovery. Choose the system image you want to use and follow the on-screen instructions to restore your System from the backup.
- Startup Repair:
- Click on Startup Repair. The tool will automatically diagnose and attempt to fix issues preventing Windows from starting.
- Command Prompt:
- Click on Command Prompt. You can run commands such as chkdsk to check the disk for errors, sfc /scannow to scan for and repair system files, or booties to fix boot issues.
- Startup Settings:
- Click on Startup Settings. Click Restart, then choose the startup option you need, such as Safe Mode, by pressing the corresponding number key.
- Uninstall Updates:
- Click on Uninstall Updates. You can choose to uninstall the latest quality or feature update, which can help resolve issues caused by recent updates.
Method 8 : Choosing “Command Prompt” on the “Advanced options” Screen
Step 1: Access the “Advanced options” Screen
- Boot from Installation or Recovery Media:
- Insert your Windows 10 installation or recovery CD/DVD and restart your computer.
- Press any key when prompted to boot from the CD/DVD.
- Select Language Preferences:
- Choose your language, time and currency format, and keyboard layout. Click Next.
- Click Repair Your Computer:
- On the Windows Setup screen, click on Repair your computer in the bottom-left corner.
- Choose Troubleshoot:
- On the “Choose an option” Screen, click Troubleshoot.
- Select Advanced options:
- On the Troubleshoot screen, click Advanced Options to access the advanced tools.
Step 2: Open Command Prompt
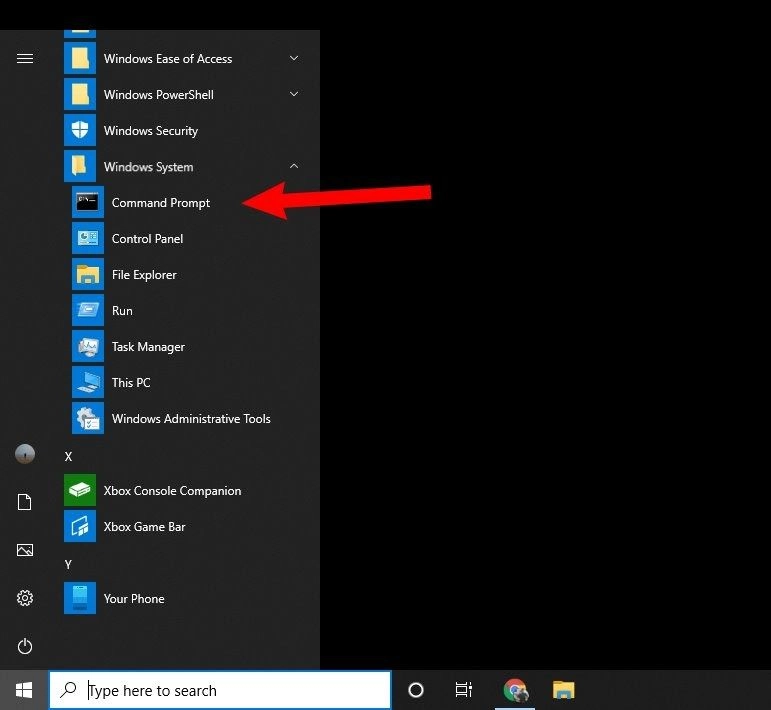
- Click on Command Prompt:
- On the Advanced options screen, click Command Prompt. This will open a command line interface where you can enter various commands to troubleshoot and repair your system.
- User Account Selection:
- You may be prompted to select an account to continue. Choose an account that has administrative privileges.
- Enter the password for the selected account if prompted.
Step 3: Using Command Prompt
- Familiarize Yourself with Basic Commands:
- Once the Command Prompt is open, you can type commands to perform various tasks. Here are some common commands and their uses:
- chkdsk:
- chkdsk C: /f /r /x: Checks the integrity of the disk, fixes errors, locates terrible sectors, and recovers readable information. Replace C with the appropriate drive letter if necessary.
- Sfc:
- Sfc/scannow: Scans and repairs corrupted system files.
- bootrec:
- bootrec /fixmbr: Repairs the Master Boot Record.
- bootrec /fixboot: Writes a new boot sector.
- bootrec /scanos: Scans for operating systems.
- bootrec /rebuildbcd: Rebuilds the Boot Configuration Data.
- diskpart:
- Opens the DiskPart tool for advanced disk management. Use list disk, select disk, and other commands to manage disks and partitions.
- credit:
- bcdedit /set {default} boot menu policy legacy: Enables the legacy boot menu.
- Execute Commands:
- Type the desired command and press Enter to execute it. Make sure to type commands carefully to avoid any unintended changes to your system.
- Navigating Directories:
- Use commands like cd (change directory) to navigate through different directories. For example, cd \Windows\System32 to navigate to the System32 directory.
- Accessing Other Drives:
- If you need to access a different drive, type the drive letter followed by a colon (e.g., D:) and press Enter.
- Viewing Files:
- Use the dir command to list the files and directories in the current directory—for example, dir C:\Windows.
Step 4: Closing Command Prompt
- Exit Command Prompt:
- Once you have finished using the Command Prompt, type exit and press Enter to close the window.
- Return to Advanced Options:
- After closing the Command Prompt, you will be returned to the Advanced options screen. You can choose to use other tools or restart your computer.
Method 9 : Entering Drive C: in Command Prompt
Step 1: Open Command Prompt
- Access Advanced Options:
- Boot from your Windows 10 installation or recovery media.
- Select your language preferences and click Next.
- Click Repair your computer.
- On the “Choose an option” screen, click Troubleshoot.
- Click Advanced options.
- Select Command Prompt.
- Select User Account:
- If prompted, select an account with administrative privileges.
- Enter the password for the chosen account if required.
Step 2: Enter Drive C
- Command Prompt Window:
- The Command Prompt (CMD) window will open, showing a prompt that typically starts with X:\Sources> or a similar directory.
- Type the Drive Letter:
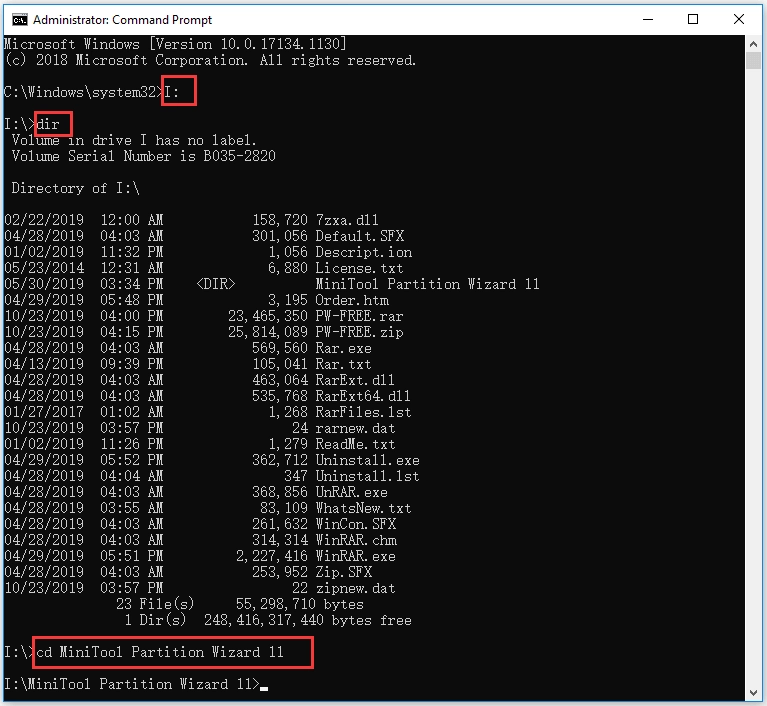
- At the prompt, type C and press Enter. This command changes the current drive to the C: drive.
- Verify the Change:
- The prompt should now show C:\> indicating that you are working within the C: drive.
Step 3: Navigating and Verifying the Drive
- List Directory Contents:
- To ensure you are in the correct drive, type dir and press Enter. This will list the contents of the C: drive.
- You should see familiar directories such as Windows, Program Files, and Users.
- Navigating Directories:
- Use the cd (change directory) command to navigate to different directories within the C: drive. For example, to navigate to the Windows directory, type cd Windows and press Enter.
- Check Current Directory:
- To check your current directory, type cd and press Enter. The Command Prompt will display the full path of the current directory.
Example Commands
- Change to C: Drive:
C:- List Contents of C: Drive:
dir- Change to Windows Directory:
cd Windows- Verify Current Directory:
cdMethod 10 : Executing Commands in Command Prompt
Step 1: Open Command Prompt and Navigate to C:
- Access Advanced Options:
- Boot from your Windows 10 installation or recovery media.
- Select your language preferences and click Next.
- Click Repair your computer.
- On the “Choose an option” screen, click Troubleshoot.
- Click Advanced options.
- Select Command Prompt.
- Select User Account:
- If prompted, select an account with administrative privileges.
- Enter the password for the selected account if required.
- Change to C: Drive:
- Type C and press Enter. The prompt should now show C:\>.
Step 2: Type and Execute the Command
- Type the Command:
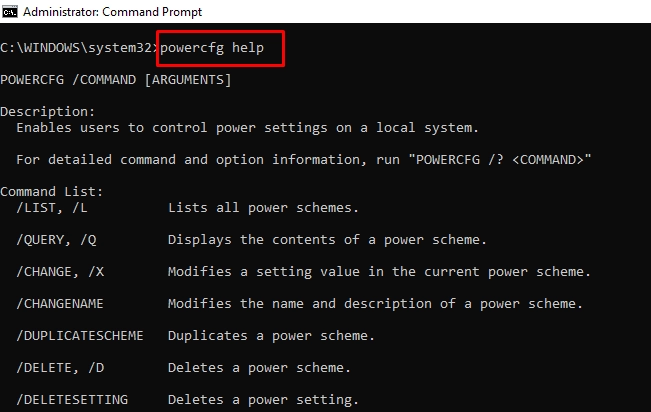
- At the C:\> prompt, type the following command strictly as provided. For example, to run the System File Checker tool, you would type: sfc /scannow
- Press Enter:
- After typing the command, press Enter to execute it.
Example Commands
Here are some useful commands you might need to execute:
- System File Checker (sfc):
- The System File Checker tool scans and repairs corrupted system files:
- sfc /scannow
- The System File Checker tool scans and repairs corrupted system files:
- Check Disk (chkdsk):
- The Check Disk tool checks the disk for errors and attempts to fix them:
- chkdsk C: /f /r /x
- The Check Disk tool checks the disk for errors and attempts to fix them:
- Bootrec:
- The Bootrec tool can fix boot problems:
- bootrec /fixmbr
- bootrec /fixboot
- bootrec /scanos
- bootrec /rebuildbcd
- The Bootrec tool can fix boot problems:
- Diskpart:
- Diskpart is a disk partitioning tool:
- diskpart
- Diskpart is a disk partitioning tool:
- Bcdedit:
- The Bcdedit tool can modify the boot configuration data:
- bcdedit /set {default} bootmenupolicy legacy
- The Bcdedit tool can modify the boot configuration data:
Step 3: Follow On-Screen Instructions
- Wait for the Command to Execute:
- Some commands, such as sfc /scannow or chkdsk, may take time to complete. Be patient and wait for the process to finish.
- Read the Output:
- After the command executes, read the output messages in the Command Prompt window. They will provide information about the action taken and any issues found or fixed.
- Execute Additional Commands if Needed:
- You can type and execute additional commands if further action is required.
Example: Running System File Checker
- Type the Command:
- sfc /scannow
- Press Enter:
- The tool will start scanning and repairing system files. This process can take several minutes.
- Review the Results:
- Once the scan is complete, review the results to see if any issues were found and repaired.
Method 11 : Closing the Command Prompt Window
Step 1: Execute Your Command
- Open Command Prompt:
- Boot from your Windows 10 installation or recovery media.
- Select your language preferences and click Next.
- Click Repair your computer.
- On the “Choose an option” screen, click Troubleshoot.
- Click Advanced options.
- Select Command Prompt.
- Change to the C: drive by typing C: and pressing Enter.
- Type and Execute Your Command:
- For example, type sfc /scannow and press Enter to scan and repair system files.
- Wait for the command to complete, and review the results shown in the Command Prompt window.
Step 2: Close the Command Prompt Window
- Type the EXIT Command:
- After your command has executed successfully, type
exitat the prompt:- exit
- After your command has executed successfully, type
- Press Enter:
- Press Enter to close the Command Prompt window. This will return you to the Advanced Options screen.
Step 3: Return to the Main Recovery Menu
- Back to Advanced Options:
- After closing the Command Prompt, you will return to the Advanced options screen.
- Choose Further Actions:
- From here, you can select other troubleshooting tools if needed or choose to continue booting into Windows.
Method 12 : Restarting Your PC and Accessing the Advanced Boot Menu
After executing commands in the Command Prompt and closing it, the following steps involve restarting your PC and accessing the Advanced Boot Menu. This menu allows you to select various boot options, including Safe Mode, which can be crucial for troubleshooting. Here’s a detailed guide on how to restart your PC and access the Advanced Boot Menu:
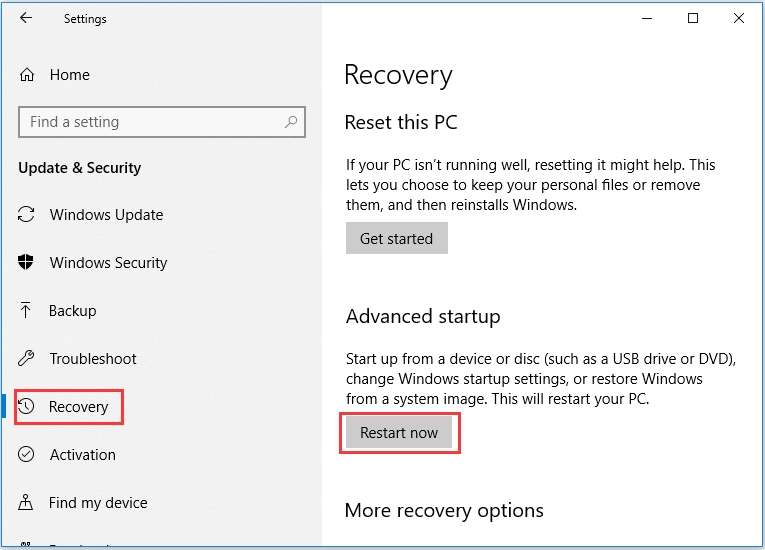
Step 1: Restart Your PC
- Close Command Prompt:
- Type exit and press Enter to close the Command Prompt window. You will be returned to the Advanced Options screen.
- Choose Continue:
- On the Advanced options screen, click on Continue. This option is usually labeled Continue (Exit and continue to Windows 10).
- Your PC will begin the restart process.
Step 2: Access the Advanced Boot Menu
- Prepare to Press F8 or Shift+F8:
- As your PC restarts, be ready to press the F8 or Shift+F8 key repeatedly. Timing is crucial here, so be attentive.
- Press F8 or Shift+F8 Repeatedly:
- Before the Windows logo appears, repeatedly press the F8 or Shift+F8 key. This action should interrupt the normal boot process and bring up the Advanced Boot Menu.
- Note: On some systems, pressing F8 alone might not work due to modern PCs’ fast boot processes. Shift+F8 may help, but it might still be challenging on specific systems.
- Alternative Method:
- If pressing F8 or Shift+F8 doesn’t bring up the Advanced Boot Menu, you may need to access the menu through other means, such as the following:
- From the Login Screen:
- You can restart your computer from the Windows login screen by holding down the Shift key while clicking the Power icon and selecting Restart.
- This will take you to the recovery options screen, where you can navigate to Troubleshoot > Advanced options > Startup Settings > Restart to access the Advanced Boot Menu.
- Using System Configuration:
- Press Win + R to open the Run dialog box, type msconfig, and press Enter.
- Go to the Boot tab in the System Configuration window and check the Safe boot option under Boot options. Apply the changes and restart your computer to boot into Safe Mode.
Step 3: Use the Advanced Boot Menu
- Choose a Boot Option:
- Once the Advanced Boot Menu appears, you can select various boot options, such as:
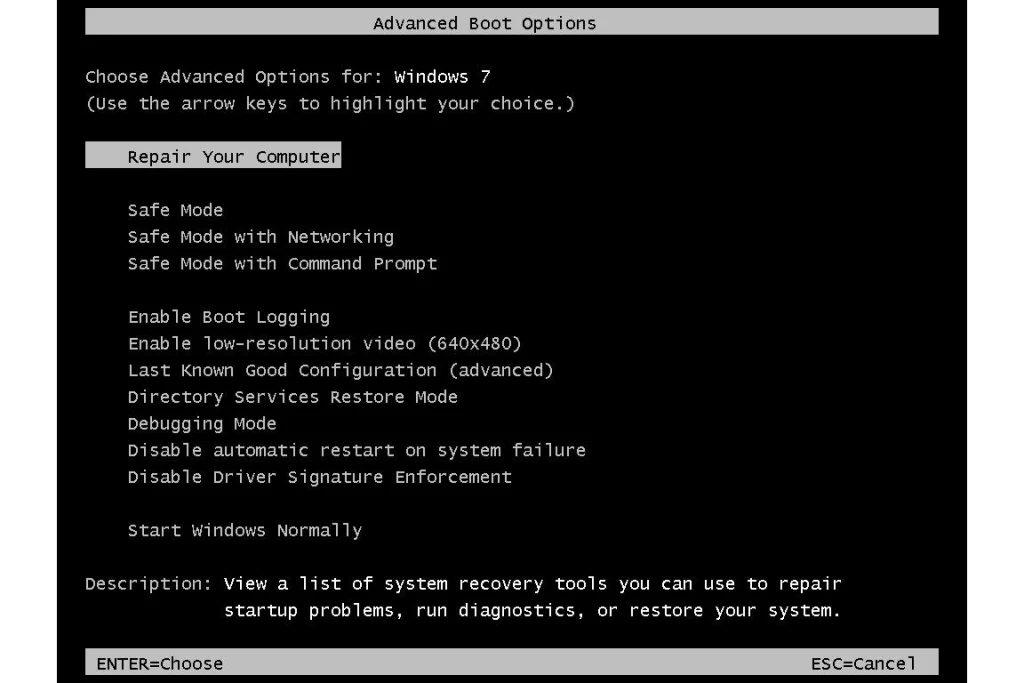
- Safe Mode: Loads a minimal set of drivers and services.
- Safe Mode with Networking: Loads Safe Mode with network drivers and services.
- Safe Mode with Command Prompt: Loads Safe Mode with the Command Prompt interface.
- Use the arrow keys to highlight your choice and press Enter.
- Once the Advanced Boot Menu appears, you can select various boot options, such as:
Additional Tips
- Quick Action: The window for pressing F8 or Shift+F8 is short, so start pressing the key as soon as the restart process begins.
- Older Systems: On older systems, pressing F8 alone is usually sufficient. Modern systems with fast boot options might require alternate methods.
- Boot Options: Familiarize yourself with the various boot options in the Advanced Boot Menu to choose the most appropriate one for your troubleshooting needs.
Related Post : How to Repair Icon Cache in Windows 10
Frequently Asked Questions (FAQs)
What is the Legacy Advanced Boot Option in Windows 10?
The Legacy Advanced Boot Option allows users to access various troubleshooting and recovery tools before the operating system fully loads. These options include Safe Mode, Command Prompt, and System Restore, which can be crucial for diagnosing and fixing issues that prevent Windows from starting normally.
Why would I need to enable the Legacy Advanced Boot Option?
Enabling the Legacy Advanced Boot Option can help you troubleshoot startup issues, perform system repairs, or access Safe Mode. It provides more control and options for fixing problems that might prevent your system from booting correctly.
How do I enable the Legacy Advanced Boot Option in Windows 10?
To enable the Legacy Advanced Boot Option:
- Open Command Prompt with administrative privileges.
- Type bcdedit /set {default} boot menu policy legacy and press Enter.
- Restart your computer.
What should I do if I can’t access the Command Prompt with administrative privileges?
If you can’t access the Command Prompt with administrative privileges:
- Boot into Safe Mode.
- Open Command Prompt with administrative privileges from there.
- Run the necessary commands.
How do I restart my computer to see the changes?
To restart your computer:
- Click on the Start Menu.
- Select the Power icon.
- Choose Restart.
Alternatively, you can use the Alt + F4 shortcut from the desktop to open the Shut Down Windows dialog box and select Restart.
Conclusion
Enabling the Legacy Advanced Boot Option in Windows 10 is a powerful and valuable tool for troubleshooting and resolving various system issues. Following the detailed steps outlined in this guide, you can access essential recovery and diagnostic tools that can help you restore your system to proper working condition. Whether you need to boot into Safe Mode, use the Command Prompt for advanced repairs, or utilize other recovery options, the Legacy Advanced Boot Option provides a reliable way to manage and fix problems that might otherwise prevent your system from operating correctly.

