How to Disable Thumbnail Previews in Windows 10 / 8.1 / 7
Thumbnail previews are a handy feature in Windows that allows you to quickly preview the contents of a file or folder by simply hovering your cursor over it. This can be especially useful when working with image, video, or document files, as it lets you quickly glimpse the file’s contents without opening it.
However, for some users, thumbnail previews can be more of a distraction than a helpful feature. You may be working on a slow or older computer, and the constant generation of thumbnail previews is slowing down your system. Or maybe you prefer a cleaner, more minimalist file explorer interface. Whatever the reason, disabling thumbnail previews can be a helpful way to optimize your Windows experience.
Table of Contents
Why You Might Want to Disable Thumbnail Previews
There are several reasons why you might want to turn off thumbnail previews in Windows:
- Performance Optimization: Generating thumbnail previews can be resource-intensive, particularly on older or slower computers. Turning off this feature can free up system resources and improve overall performance.
- Minimalist Aesthetic: Some users prefer a more streamlined, minimalist file explorer interface without the visual clutter of thumbnail previews.
- Privacy Concerns: In some cases, thumbnail previews can inadvertently reveal sensitive information, such as the contents of a document or the thumbnails of private images. Turning off this feature can help mitigate such privacy risks.
- Compatibility Issues: Certain software or system configurations may not play well with thumbnail previews, leading to compatibility problems or even system crashes. Turning off the feature can help resolve these issues.
Windows 10
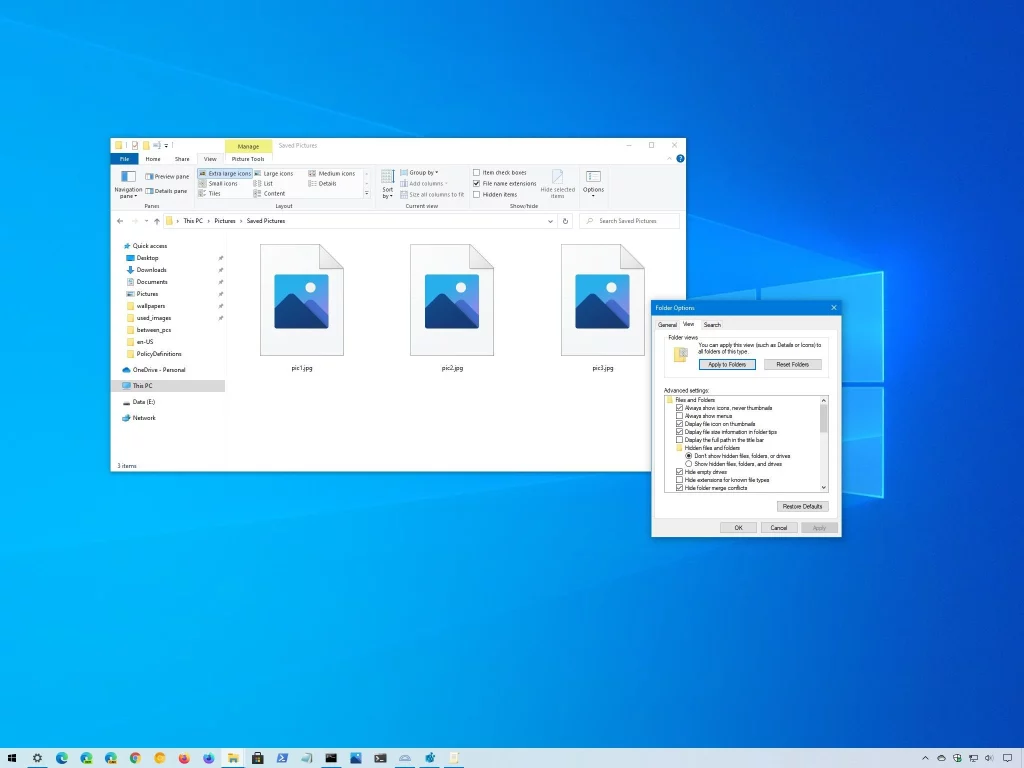
- Open the File Explorer Options:
- Press the Windows key + E to open the File Explorer.
- Click on the “View” tab at the top of the File Explorer window.
- Click the “Options” button, then select “Change folder and search options”.
- Navigate to the “View” Tab:
- In the Folder Options window, click on the “View” tab.
- Disable Thumbnail Previews:
- Under the “Advanced settings” section, locate the “Show thumbnails instead of icons” option.
- Uncheck this option to turn off thumbnail previews.
- Apply the Changes:
- Click “Apply” to save the changes, then click “OK” to close the Folder Options window.
That’s it! You’ve successfully turned off thumbnail previews in Windows 10. The next time you open the File Explorer, you should see regular file icons instead of thumbnail previews.
Windows 8.1
The process for turning off thumbnail previews in Windows 8.1 is very similar to the steps for Windows 10:
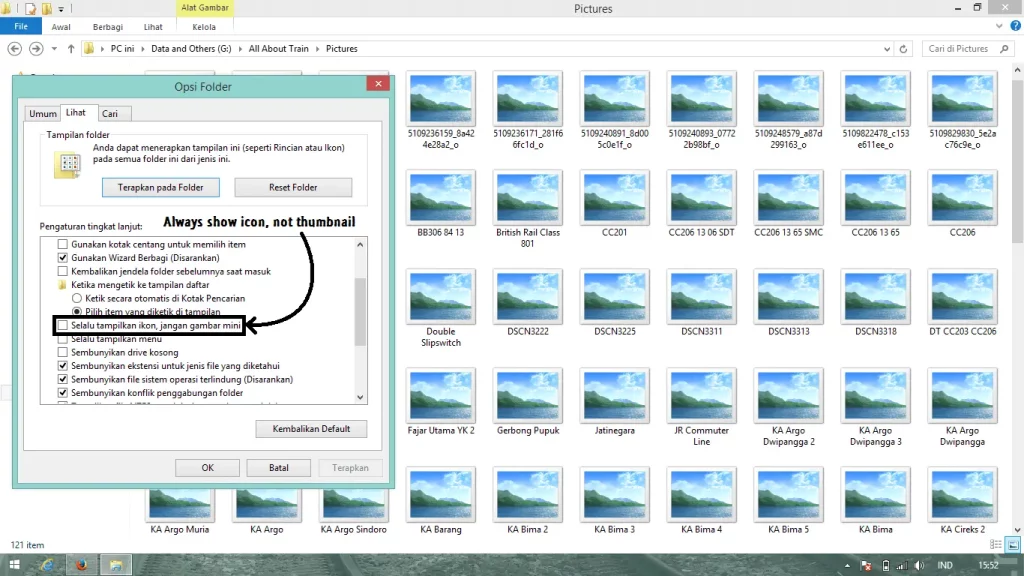
- Open the File Explorer Options:
- Press the Windows key + E to open the File Explorer.
- Click on the “View” tab at the top of the File Explorer window.
- Click the “Options” button, then select “Change folder and search options”.
- Navigate to the “View” Tab:
- In the Folder Options window, click on the “View” tab.
- Disable Thumbnail Previews:
- Under the “Advanced settings” section, locate the “Show thumbnails instead of icons” option.
- Uncheck this option to turn off thumbnail previews.
- Apply the Changes:
- Click “Apply” to save the changes, then click “OK” to close the Folder Options window.
Windows 7
The process for turning off thumbnail previews in Windows 7 is slightly different but still straightforward:
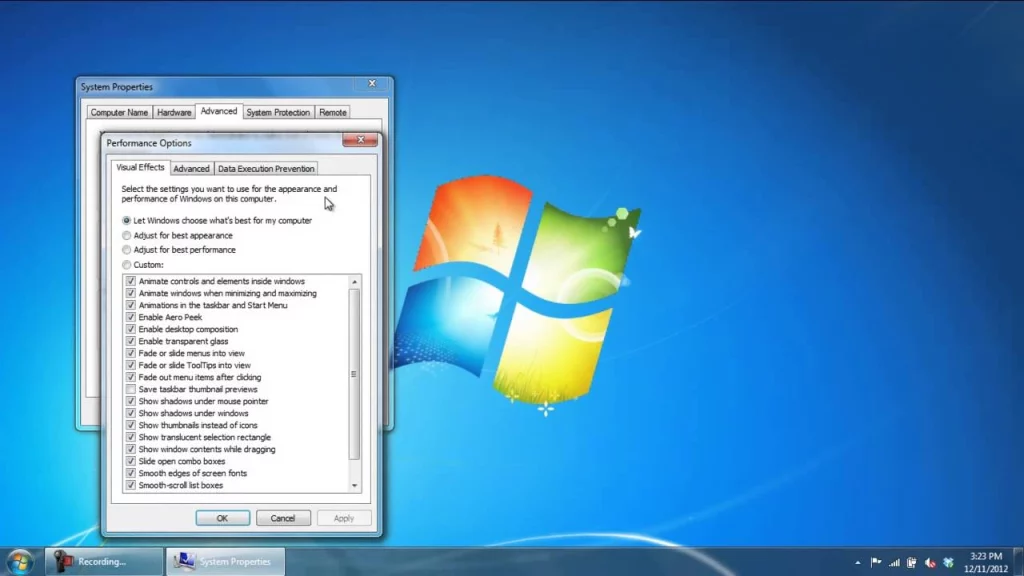
- Open the Folder Options:
- Press the Windows key + R to open the Run dialog box.
- Type “control folders” and press Enter to open the Folder Options window.
- Navigate to the “View” Tab:
- In the Folder Options window, click on the “View” tab.
- Disable Thumbnail Previews:
- Under the “Advanced settings” section, locate the “Show thumbnails instead of icons” option.
- Uncheck this option to turn off thumbnail previews.
- Apply the Changes:
- Click “Apply” to save the changes, then click “OK” to close the Folder Options window.
How To Fix File System Errors with Check Disk Utility (CHKDSK)
Suppose you’ve been experiencing issues with file system errors or corrupted files after turning off thumbnail previews. In that case, you may need to run the Check Disk Utility (CHKDSK) to scan and repair any underlying issues.
Here’s how to do it:
- Open the Command Prompt:
- Press the Windows key + R to open the Run dialog box.
- Type “cmd” and press Enter to open the Command Prompt.
- Run the CHKDSK Command:
- Type “chkdsk /f” in the Command Prompt and press Enter.
- This will initiate a scan of your file system and attempt to fix any errors it finds.
- Wait for the Scan to Complete:
- Depending on the size of your hard drive and the number of files, the CHKDSK scan may take several minutes to complete.
- Be patient and let the process run its course.
- Restart Your Computer:
- Once the CHKDSK scan is finished, restart your computer to ensure all changes are correctly applied.
By running the CHKDSK utility, you can help ensure that your file system is healthy and that any issues caused by turning off thumbnail previews are resolved.
How to Turn Off DEP (Data Execution Prevention)
Data Execution Prevention (DEP) is a security feature in Windows that helps protect your system from malware and other potentially harmful software. However, in some cases, DEP can interfere with the proper functioning of specific programs or system settings, including disabling thumbnail previews.
If you’re experiencing issues after turning off thumbnail previews, you may need to turn off DEP temporarily to resolve the problem. Here’s how to do it:
- Open the System Properties:
- Press the Windows key + R to open the Run dialog box.
- Type “sysdm. cpl” and press Enter to open the System Properties window.
- Navigate to the “Advanced” Tab:
- In the System Properties window, click on the “Advanced” tab.
- Disable DEP:
- Under the “Performance” section, click the “Settings” button.
- In the Performance Options window, click on the “Data Execution Prevention” tab.
- Select the “Turn off DEP for all programs and services” option, then click “OK” to save the changes.
- Restart Your Computer:
- Once you’ve disabled DEP, restart your computer to ensure the changes take effect.
After restarting, you should be able to use your system without any issues turning off thumbnail previews. Remember to reenable DEP once you’ve resolved the problem to maintain your system’s security.
How to Fix COM Surrogate has Stopped Working
The “COM Surrogate has stopped working” error is a common issue in Windows when working with thumbnail previews or other media-related tasks. It can be caused by various factors, including corrupted system files, outdated drivers, or conflicts with other software.
Here’s how you can try to fix the “COM Surrogate has stopped working” error:
- Update Your Graphics Drivers:
- Open the Device Manager by pressing the Windows key + X and selecting “Device Manager”.
- Expand the “Display adapters” section and right-click on your graphics card.
- Select “Update driver” and follow the on-screen instructions to install the latest driver version.
- Scan for Malware:
- Run a full system scan using your preferred antivirus software to check for any malware or viruses causing the issue.
- Disable Hardware Acceleration:
- Open the Control Panel and navigate to the “Appearance and Personalization” section.
- Click on “Personalization” and then “Window Color”.
- Uncheck the “Enable hardware acceleration” option and click “OK” to save the changes.
- Run the System File Checker:
- Open the Command Prompt (Admin) by pressing the Windows key + X and selecting “Command Prompt (Admin)”.
- Type “sfc /scannow” and press Enter to initiate a scan for corrupted system files.
- Restart Your Computer:
- After trying the above steps, restart your computer to ensure the changes take effect.
If the “COM Surrogate has stopped working” error persists, you may need to explore more advanced troubleshooting options, such as performing a clean Windows installation or seeking professional assistance.
Related Post : 9 Common Windows 10 Problems and Their Simple Solutions
How to Create System Restore Point – The Easy Way
Creating a system restore point is crucial before making any significant changes to your Windows system, such as disabling thumbnail previews. This will allow you to quickly revert to your system’s previous working state if any issues arise.
Here’s how to create a system restore point in Windows:
- Open the System Properties:
- Press the Windows key + R to open the Run dialog box.
- Type “sysdm. cpl” and press Enter to open the System Properties window.
- Navigate to the “System Protection” Tab:
- Click on the “System Protection” tab in the System Properties window.
- Create a Restore Point:
- Click the “Create” button to open the “Create a restore point” window.
- Enter a descriptive name for the restore point, such as “Disabled Thumbnail Previews.”
- Click “Create” to generate the restore point.
- Verify the Restore Point:
- Once the restore point has been created, you can verify its existence by clicking the “System Restore” button and selecting the restore point you just created.
By creating a system restore point before turning off thumbnail previews, you’ll have a safety net in case any problems arise. This will allow you to quickly and easily revert your system to a previous working state if needed.
Additional Tips and Tricks for Customizing Thumbnail Previews
While turning off thumbnail previews can be a helpful way to optimize your Windows experience, there are also several other ways you can customize this feature to suit your needs better:
- Adjust Thumbnail Size:
- In the Folder Options window, under the “View” tab, you can adjust the size of the thumbnail previews by selecting a different option from the “Thumbnail size” dropdown menu.
- Enable Thumbnail Previews for Specific File Types:
- Suppose you only want to turn off thumbnail previews for specific file types. In that case, you can selectively turn the “Show thumbnails instead of icons” option on or off for particular file extensions.
- Disable Thumbnail Caching:
- To further improve performance, you can turn off the thumbnail caching feature, which stores thumbnail previews on your hard drive. To do this, uncheck the “Save check disk thumbnails” option in the Folder Options window.
- Use Third-Party Tools:
- Various third-party tools are available that can provide more advanced thumbnail preview customization options, such as the ability to set custom thumbnail sizes or disable previews for specific file types.
By experimenting with these additional customization options, you can find the perfect balance between performance, aesthetics, and functionality for your Windows experience.
Troubleshooting Common Issues
While turning off thumbnail previews is generally straightforward, you may encounter some common issues or problems along the way. Here are a few troubleshooting tips to help you address these problems:
- File Explorer Crashes or Freezes:
- If you experience crashes or freezes in the File Explorer after disabling thumbnail previews, try running the CHKDSK utility or disabling DEP, as described earlier in the article.
- Thumbnail Previews Still Appear:
- If you’ve followed the steps to turn off thumbnail previews, but they still appear in the File Explorer, try clearing your thumbnail cache by running the following command in the Command Prompt:
- ie4uinit.exe -ClearIconCache
- If you’ve followed the steps to turn off thumbnail previews, but they still appear in the File Explorer, try clearing your thumbnail cache by running the following command in the Command Prompt:
- Performance Issues Persist:
- If you’re still experiencing performance issues even after turning off thumbnail previews, try closing any resource-intensive applications or background processes that may be contributing to the problem.
- Compatibility Problems with Other Software:
- If you’re encountering compatibility issues with other software after turning off thumbnail previews, reenabling the feature or exploring alternative troubleshooting steps.
Remember, every Windows system is unique, so the specific troubleshooting steps you need to take may vary. If you can’t resolve the issue on your own, don’t hesitate to seek assistance from Microsoft support or other online resources.
Frequently Asked Questions (FAQ)
Q: Will disabling thumbnail previews affect the functionality of my File Explorer?
A: No, disabling thumbnail previews will not significantly affect the overall functionality of the File Explorer. You’ll still be able to view and manage your files and folders as usual, just without the thumbnail preview images.
Q: Can I selectively turn off thumbnail previews for specific file types?
A: In the Folder Options window, you can turn off thumbnail previews for specific file types by adjusting the “Show thumbnails instead of icons” option.
Q: Will disabling thumbnail previews improve my system’s performance?
A: In many cases, yes. Generating and displaying thumbnail previews can be resource-intensive, particularly on older or slower computers. Turning off this feature can help free up system resources and improve overall performance.
Q: Can I reenable thumbnail previews if I change my mind?
A: Absolutely. The process for turning off thumbnail previews is reversible, so you can easily reenable the feature if you decide you want it back. Follow the same steps outlined in the article, but check the “Show thumbnails instead of icons” option this time.
Q: Will disabling thumbnail previews affect the quality or appearance of my files?
A: No, disabling thumbnail previews will not affect the actual quality or appearance of your files. It only changes how those files are displayed in the File Explorer, not the underlying data.
Conclusion
Ultimately, whether or not to turn off thumbnail previews in Windows is a personal decision that depends on your specific needs and preferences. Turning off thumbnail previews can be a helpful solution if you’re looking to optimize your system’s performance, minimize visual clutter, or address privacy concerns.
If you found this guide helpful in disabling thumbnail previews on your Windows system, share it with your friends and colleagues who might also benefit from this optimization tip. Let’s work together to get the most out of our Windows experiences!

