How to Master Volume Control for Skype on Windows 10
As an experienced Skype user, I understand the importance of precisely controlling the volume levels during video and voice calls. Windows 10 offers a range of options to manage Skype’s audio settings, but many users need help finding the right balance. In this comprehensive guide, I’ll walk you through the steps to turn down Skype volume in Windows 10 and share additional tips to ensure optimal audio quality for your Skype conversations.
Table of Contents
Why is it Important to Adjust Skype Volume?
Maintaining the proper volume levels in Skype is crucial for several reasons:

- Comfort and Clarity: Excessive Volume can be uncomfortable and even damaging to your ears, while low Volume can make it difficult to hear your conversation partner. Adjusting the Skype volume to the right level ensures a comfortable and distraction-free experience.
- Avoiding Disruptions: If the Skype volume is too high, it can cause echoes and feedback or even disrupt the audio for other participants in the call. Proper volume control helps maintain a seamless and professional communication experience.
- Improved Concentration: When the Skype volume is at the right level, you can focus better on the conversation without being distracted by overpowering or muffled audio.
- Compatibility with Other Applications: Adjusting the Skype volume can also help ensure that it doesn’t interfere with the audio settings of other programs running on your Windows 10 device.
Step-by-Step Guide to Turning Down Skype Volume in Windows 10
Follow these simple steps to turn down the Skype volume in your Windows 10 system:
- Open the Skype Application: Launch the Skype application on your Windows 10 device.

- Access the Settings Menu: Click on the three-dot menu icon in the top-right corner of the Skype window and select “Settings” from the dropdown menu.

- Navigate to the Audio Settings: In the Settings menu, locate the “Audio & Video” section and click on it.

- Adjust the Speaker Volume: You will find a volume slider under the “Speaker” section. Drag the slider to the left to decrease the Skype volume to your desired level.
- Save the Changes: Once you’ve set the Skype volume to your preferred level, click the “Save” button at the bottom of the Settings menu to apply the changes.

Remember, you can also use the Volume controls on your Windows 10 device or the volume buttons on your Skype-enabled headset or speakers to fine-tune the Skype volume further.
Additional Tips for Controlling Skype Volume
Here are some additional tips to help you gain better control over the Skype volume in Windows 10:
- Use the Keyboard Shortcuts: You can quickly adjust the Skype volume by using the keyboard shortcuts. Press “Ctrl + Up Arrow” to increase the Volume and “Ctrl + Down Arrow” to decrease it.
- Customize the Default Volume Level: In the Skype Settings menu, you can set the default volume level for incoming calls, outgoing calls, and notifications. This can help ensure that the Skype volume is always at your preferred level when you start a new call.
- Adjust the Microphone Volume: In addition to the speaker volume, you can adjust the microphone volume in the Skype Settings menu. This can help ensure your voice is picked up at the right level, preventing echoes or distortions.
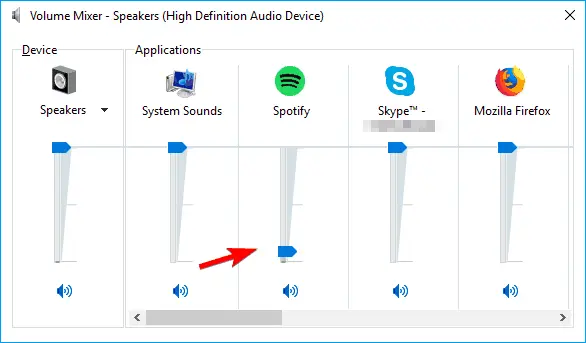
- Use the Volume Mixer: The Windows 10 Volume Mixer allows you to control the Volume of individual applications, including Skype. This can be helpful if you need to balance the Skype volume with other audio sources on your system.
- Experiment with Different Headset or Speaker Settings: If you’re using a headset or external speakers with your Windows 10 device, try adjusting the volume settings on the device itself to find the optimal Skype volume level.
Troubleshooting Common Issues with Skype Volume in Windows 10
Sometimes, you may encounter issues with the Skype volume in Windows 10. Here are a few common problems and their solutions:

- Skype Volume is Too Low: If the Skype volume is too low, even after adjusting the settings, try the following:
- Check the Windows 10 volume mixer to ensure the Skype volume is not muted or too low.
- Ensure that your headset or speakers are correctly connected and the Volume is up.
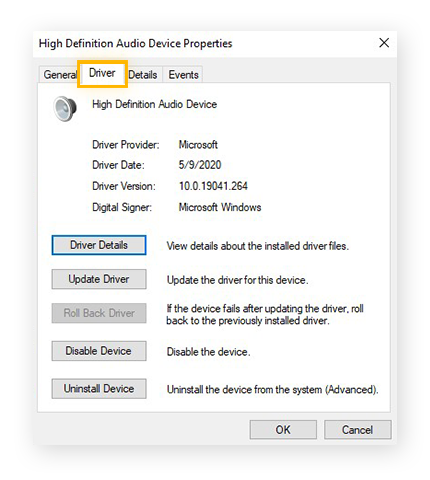
- Update the audio drivers on your Windows 10 device to the latest version.
- Skype Volume is Too High: If the Skype volume is too high, causing distortion or discomfort, try the following:
- Adjust the Skype volume settings as described in the step-by-step guide.
- Check the Windows 10 volume mixer and ensure the Skype volume is not too high.
- Turn off any audio enhancements or boost settings that may amplify the Skype audio.
- Skype Volume is Inconsistent: If the Skype volume seems to fluctuate during a call, try the following:
- Ensure that your internet connection is stable and provides consistent bandwidth.
- Check for any background applications or processes that may interfere with the Skype audio.
- Update the Skype application to the latest version to address any known volume-related bugs.
By following these troubleshooting steps, you should be able to resolve the most common Skype volume issues in your Windows 10 environment.
Advanced Settings for Fine-Tuning Skype Volume in Windows 10
For users who want to have more granular control over the Skype volume, Windows 10 offers several advanced settings:
- Skype Audio Device Settings: In the Skype Settings menu, you can select the audio input and output devices you want to use for your Skype calls. This can be helpful if multiple audio devices are connected to your Windows 10 system.
- Skype Audio Enhancements: The Skype Settings menu also allows you to turn on or off various audio enhancements, such as noise cancellation, echo cancellation, and automatic gain control. Experimenting with these settings can help you achieve the best possible audio quality.
- Windows 10 Audio Settings: In addition to the Skype-specific settings, you can access the Windows 10 audio settings by right-clicking the volume icon in the system tray and selecting “Open Sound settings.” Here, you can adjust the overall system volume and configure the properties and settings for your audio devices.
- Registry Edits: Advanced users can modify the Windows 10 registry directly to fine-tune the Skype volume settings. However, exercising caution when making registry edits is essential, as improper changes can lead to system instability or other issues.
Remember, the advanced settings should be used carefully only if the primary volume control methods do not provide the desired results.
Alternative Methods for Adjusting Skype Volume in Windows 10
While the steps outlined in this guide focus on adjusting the Skype volume directly within the application, there are also alternative methods you can use to control the Volume:
- Using the Windows 10 Volume Mixer: As mentioned earlier, the Windows 10 Volume Mixer allows you to adjust the Volume of individual applications, including Skype. This can be useful if you need to balance the Skype volume with other audio sources on your system.
- Utilizing Third-Party Volume Control Software: Various third-party volume control applications, such as Volume2, EarTrumpet, and VoiceMeeter, are available for Windows 10. These tools provide advanced volume management features that can help fine-tune the Skype volume.
- Adjusting the Volume on Your Headset or Speakers: If you’re using a headset or external speakers with your Windows 10 device, you can often change the Volume directly on the device itself. This can be a quick and convenient way to control the Skype volume without navigating the application settings.
By exploring these alternative methods, you can find the approach that best suits your specific needs and preferences for managing the Skype volume in Windows 10.
Best Practices for Optimal Skype Volume Settings in Windows 10
To ensure the best possible Skype audio experience in your Windows 10 environment, consider the following best practices:
- Establish a Baseline Volume Level: Start by setting the Skype volume to a comfortable level that allows you to hear your conversation partner clearly without straining your ears.
- Adjust the Volume Based on Environmental Factors: If you’re in a noisy environment or using a poor-quality microphone, you may need to increase the Skype volume to compensate. Conversely, turn the Volume down to avoid discomfort in a quiet setting.
- Optimize the Microphone Volume: Ensure your microphone volume is set to an appropriate level to avoid clipping or muffled audio. You can adjust the microphone volume in the Skype Settings menu.
- Use Headphones or a High-Quality Headset: Investing in a good pair of headphones or a dedicated Skype headset can significantly improve the audio quality and help you control the volume levels better.
- Keep the Skype Volume Consistent Across Calls: You can ensure a consistent audio experience across all your Skype calls by setting the default Skype volume in the application settings.
- Monitor and Adjust the Volume as Needed: Regularly check the Skype volume during calls and adjust as necessary to maintain the optimal audio quality.
- Stay Up-to-Date with Skype and Windows 10 Updates: Ensure that you have the latest version of Skype and that your Windows 10 system is fully updated, as this can help resolve any volume-related bugs or issues.
Following these best practices, you can achieve the perfect Skype volume settings in your Windows 10 environment and enjoy seamless, high-quality audio experiences during Skype calls.
Frequently Asked Questions
Q: What is Skype mainly used for?
A: Millions of individuals and businesses use Skype to make free video and voice one-to-one and group calls , send instant messages and share files with other people on Skype.
Q: Who is the CEO of Skype?
A: Niklas Zennström, CEO of Atomico and Co-Founder of Skype.
Q: Which country mostly use Skype?
A: In the six months ending December 2023, the United States accounted for 13.31 percent of traffic to the video calling service Skype.com. The Russian Federation was ranked second, accounting for 6.51 percent of web visits to the platform.
Q: Which country made Skype?
A: Skype was founded in 2003 by Niklas Zennström, from Sweden, and Janus Friis, from Denmark. The software was created by Estonians Ahti Heinla, Priit Kasesalu, Jaan Tallinn, and Toivo Annus.
Q: What is the full meaning of Skype?
A: Sky peer-to-peer, Skype is a software application that allows users to make voice and video calls and chats over the Internet. One of the initial names for the project was “Sky peer-to-peer”, which was then full form of “Skyper”.
Conclusion
Maintaining the right Skype volume ensures a comfortable and productive communication experience in your Windows 10 environment. Following the steps outlined in this guide, you can quickly turn down the Skype volume and fine-tune the audio settings to your liking.
Remember, the key to mastering Skype volume control is to experiment with the various settings and techniques until you find the perfect balance that suits your needs. With a little bit of practice and the help of this comprehensive guide, you’ll be well on your way to becoming an expert in Skype volume control.
If you found this guide helpful, share it with your friends and colleagues looking to improve their Skype audio experience on Windows 10. And remember to subscribe to our blog for more tips and tutorials on getting the most out of your technology.
Related Article: Changing Skype Notification Sound on Android: Step-by-Step

