A Step-by-Step Guide: How to Use System Restore in Microsoft Windows
This guide provides a step-by-step guide on using System Restore in Microsoft Windows. It allows users to safely revert their computer’s state to a previous state without affecting files, making it suitable for both experienced and new users.
Table of Contents
What is System Restore, and How Does it Work?
System Restore is a built-in utility in Microsoft Windows that creates periodic “restore points” – snapshots of your System’s configuration and settings at a particular time. These restore points can be used to roll back your System to a previous, stable state, effectively undoing any changes that may have led to system instability, crashes, or other issues.

System Restore saves information about your System’s drivers, registry, and other critical files, as well as any installed programs and updates. When you initiate a System Restore, the utility will revert your System to the selected restore point, effectively undoing any changes that occurred after that point.
When should you use System Restore?
There are several scenarios when you might want to use System Restore:

- After a system crash or unexpected issue: If your computer starts behaving erratically, experiencing frequent crashes, or exhibiting other problematic behavior, System Restore can help you revert to a previous, stable state.
- Before installing new software or drivers: Whenever you’re about to install a new program or update your system drivers, creating a System Restore point is a good idea. If the installation causes any issues, you can easily roll back your System to the previous working state.
- Before making major system changes: Significant changes to your System, such as modifying the registry or altering system files, can also benefit from a System Restore point. You can revert your System to the pre-change state if something goes wrong.
- As a troubleshooting step: If you’re experiencing issues with your Windows installation and are unsure of the root cause, using System Restore can be a valuable troubleshooting step to isolate the problem.
Step 1: Accessing System Restore in Microsoft Windows
The process of using System Restore in Microsoft Windows is straightforward. Here’s how you can access it:

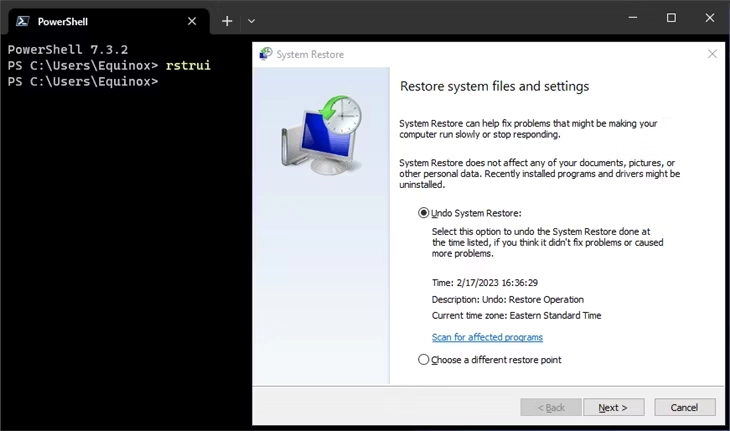
- Open the Start menu and search for “System Restore.”
- Click the “Create a restore point” option to launch the System Properties window.
- Click the “System Restore” button in the System Protection tab to begin the process.
Step 2: Choosing a Restore Point
Once the System Restore wizard opens, you’ll have a list of available restore points. Windows creates These restore points automatically, and you can create custom restore points as needed.
- Review the list of restore points and select the one that best suits your needs. Look for restore points created before the issue you’re trying to resolve.
- Click “Next” to proceed to the next step.
Step 3: Confirming the Restore Process
Before the restoration begins, the System Restore wizard will display a summary of the selected restore point and ask you to confirm the process.
- Carefully review the information provided to ensure you’ve selected the correct restore point.
- Click “Finish” to initiate the System Restore process.
Step 4: Waiting for the Restore to Complete
The System Restore process may take several minutes, depending on the size of your System and the number of changes that need to be reverted. During this time, your computer may restart a few times.
- Be patient and let the System Restore wizard complete its work.
- Avoid interrupting the process or turning off your computer, which could cause further issues.
Step 5: Verifying the Success of the Restore
Once the System Restore process is complete, your computer should be back to its state at the selected restore point.

- Check your System to ensure that the issue you were trying to resolve has been addressed.
- If the problem persists, you may need to try a different restore point or explore other troubleshooting options.
How to enable System Restore in Windows
If System Restore is not enabled on your Windows computer, you can quickly turn it on by following these steps:
- Open the Start menu and search for “System Restore.”
- Click the “Create a restore point” option to launch the System Properties window.
- In the System Protection tab, select the drive you want to enable System Restore (typically the C: drive).
- Click the “Configure” button and select “Turn on system protection.”
- If desired, adjust the maximum disk space usage for restore points, then click “OK” to save the changes.
How to Recover the Computer Using System Restore in Windows
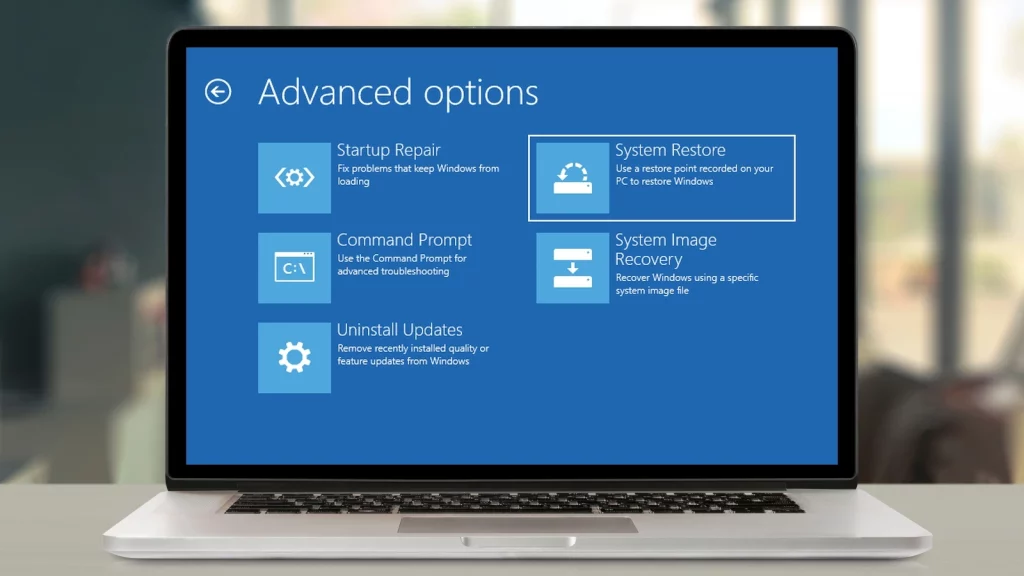
If your computer is experiencing severe issues and needs a full system recovery, you can use System Restore from the Windows Recovery Environment. Here’s how:
- Restart your computer and enter the Windows Recovery Environment (typically by pressing a specific key during boot, such as F11 or F8).
- In the recovery environment, select “Troubleshoot” and then choose “System Restore.”
- Follow the on-screen instructions to select a restore point and initiate recovery.
How to Create a System Restore Checkpoint in Windows
- In addition to the automatic restore points created by Windows, you can manually create custom restore points whenever you want to capture your System’s current status. System the Start menu and search for “System Restore.”
- Click the “Create a restore point” option to launch the System Properties window.
- In the System Protection tab, click the “Create” button.
- Enter a descriptive name for the restore point and click “Create” to save it.
Related Post : How to Fix Headphones Not Working in Windows 10
Troubleshooting Common Issues with System Restore
While System Restore is generally a reliable tool, there are a few common issues that you may encounter:
- System Restore fails to complete: If the System Restore process is interrupted or fails to finish, try restarting your computer and rerunning the process.
- No restore points are available: If you don’t see any available restore points, check if System Restore is enabled on your System. If the maximum disk space for restore points has been reached,
- System Restore doesn’t resolve the issue: If the problem persists after a successful System Restore, try other troubleshooting methods or contact Microsoft support for further assistance.
Conclusion
System Restore is a crucial feature in Microsoft Windows that aids in recovering from system issues. Regularly creating restore points and using SysteSystemore for troubleshooting are essential for maintaining system stability. Subscribe to our newsletter for more Windows tips.


