Debloat Windows 10: Ultimate Guide to Boost PC Performance
Having a sluggish computer can be incredibly frustrating in today’s fast-paced digital world. Over time, Windows 10 can become bogged down with unnecessary features and bloatware, leading to decreased performance and efficiency. Debloat Windows 10 is a process that removes these unwanted applications and features, effectively refreshing your system and enhancing its speed and responsiveness. This comprehensive guide will walk you through everything you need about debloating Windows 10, from why you should do it to the best methods and tools available. Whether using a high-end machine or an older PC, debloating can make a significant difference.
Table of Contents
Why You Need to Debloat Windows 10
The Windows operating system has evolved significantly, with each new version adding more features and applications. While many of these additions are helpful, some are unnecessary and can slow down your system. Here are some reasons why you should consider debloating Windows 10:
- Improve Performance: Removing bloatware and unnecessary features can free up system resources, leading to faster performance.
- Reduce Clutter: Debloating can help streamline your system, making it easier to navigate and use.
- Save Storage Space: Unwanted applications can take up valuable storage space. Debloating can help you reclaim this space for more important files and applications.
- Enhance Privacy and Security: Some built-in applications may have privacy concerns. Removing these can enhance your system’s security.
Also Read: Reset Display Settings on Windows 10 Easily Quick Fix
How to Debloat Windows 10: Methods and Tools
Method 1: Using Settings to Remove Bloatware
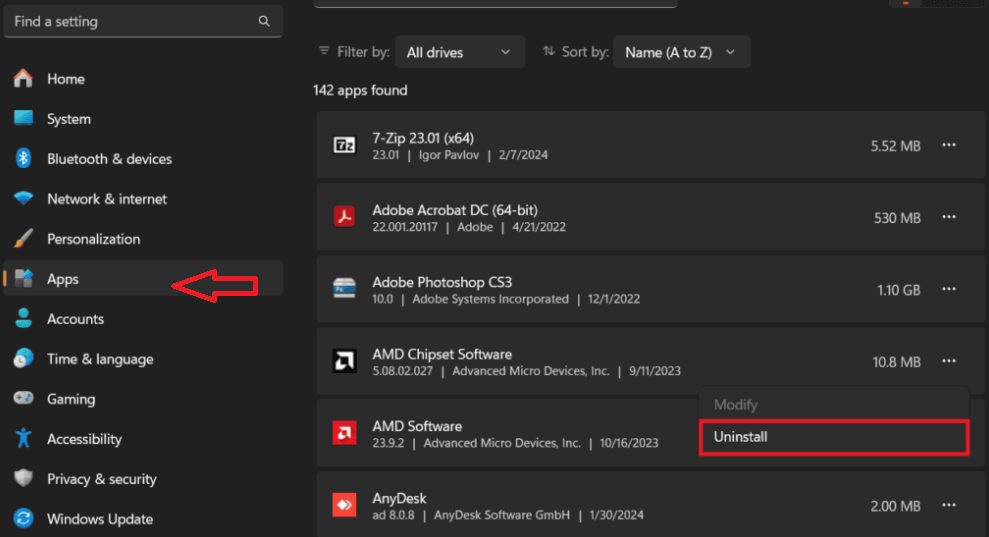
One of the simplest ways to debloat Windows 10 is by manually uninstalling unwanted applications through the Settings menu. This method is straightforward but may only remove some built-in components.
- Open Settings: Press Windows + I to open the Settings menu.
- Navigate to Apps: Click on ‘Apps’ from the left-hand menu.
- Find Installed Apps: Select ‘Installed apps’ in the right pane.
- Uninstall Unwanted Apps: Click on the three dots next to the app you wish to uninstall and select ‘Uninstall’ from the drop-down menu. Confirm your action by clicking ‘Yes’.
Method 2: Using PowerShell to Remove Bloatware
PowerShell is a powerful tool that can remove bloatware more effectively than the Settings menu. This method can remove both applications and system features.
Option 1: Direct Script Entry
- Open PowerShell as Administrator: Right-click the Start button and select ‘Windows PowerShell (Admin)’.
2. Enter the Script: Copy and paste the following script and press Enter:
Get-AppxPackage | Remove-AppxPackage3. Ignore Errors: It’s normal to see error messages for packages that can’t be removed. These can be ignored.
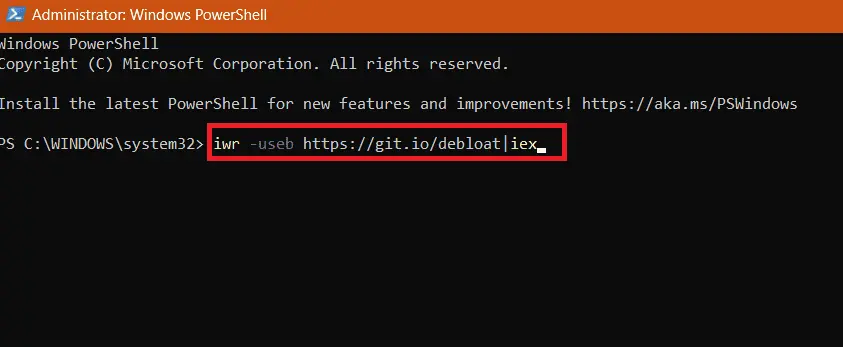
Option 2: Using a Pre-made Script
- Download the Script: Visit the GitHub page for Windows10Debloater.
2. Copy the Script Link: Copy the link provided under the ‘Quick download link’:
iwr -useb https://git.io/debloat|iex3. Run the Script: Paste the copied link into PowerShell and press Enter. Follow the prompts to debloat your system.
Option 3: Downloading and Running the Script File
- Download the ZIP File: Go to the GitHub page, click the ‘Code’ button, and select ‘Download ZIP’.
- Extract the ZIP File: Extract the downloaded file and open the folder.
- Run with PowerShell: Right-click ‘Windows10DebloaterGUI.ps1’ and select ‘Run with PowerShell’. Follow the prompts to select and remove bloatware.
Method 3: Using Group Policy Editor (Windows 10 Pro)
The Group Policy Editor can fine-tune and debloat Windows 10 for advanced users. This method is more complex but offers greater control.
- Open Group Policy Editor: Press Windows + R and type gpedit. msc, and press Enter.
- Navigate to Policies: Explore various policies under ‘Computer Configuration’ and ‘User Configuration’.
- Disable Unnecessary Features: Disable features such as Windows Search internet use, Windows Error Reporting, etc., according to your needs.
FAQs About Debloating Windows 10
Q: What is bloatware?
A: Bloatware refers to unwanted applications and features pre-installed on your computer, often taking up resources and slowing down performance.
Q: Is debloating Windows 10 safe?
A: Debloating is generally safe if you follow instructions carefully and create a system restore point before making changes.
Q: Can debloating improve gaming performance?
A: Yes, debloating can free up system resources, which may lead to enhanced gaming performance.
Q: Will debloating remove essential Windows features?
A: If done correctly, debloating should not remove essential features. It’s crucial to follow guides and choose which features to remove carefully.
Q: Should I be an advanced user who can debloat Windows 10?
A: Basic debloating can be done by anyone using the Settings menu. More advanced methods, like using PowerShell or Group Policy Editor, may require some technical knowledge.
Conclusion
Debloating Windows 10 effectively enhances your computer’s performance, reduces clutter, and improves efficiency. Whether you use the Settings menu, PowerShell, or advanced tools like the Group Policy Editor, there are multiple ways to achieve a streamlined and optimized system. Following this guide, you can easily debloat your Windows 10 PC and enjoy a faster, more responsive computing experience. Always remember to create a system restore point before making significant changes, and feel free to experiment in a virtual machine to ensure the best results for your specific use case.
Related Article: Effortless BIOS Access on Windows 10: Skip the Restart

