How to Fix Chromebook Camera Not Working Issue
This guide provides a comprehensive guide for Chromebook users to troubleshoot device camera issues. The camera is essential for video conferences, capturing memorable moments, and facilitating secure logins. However, users may encounter problems with the camera, preventing them from engaging in video calls or capturing precious moments. The guide covers various methods to diagnose and fix the camera issue, from basic troubleshooting to advanced solutions. Whether a seasoned user or a newcomer, this guide will provide the necessary tools to overcome this common challenge.
Table of Contents
Common reasons for Chromebook camera not working
Before we delve into the troubleshooting steps, it’s essential to understand some common reasons why your Chromebook camera might not be working. By identifying the root cause, you can better target your efforts and increase the likelihood of resolving the issue. Here are some potential reasons for a non-functioning Chromebook camera:
- Software Updates: Outdated software or drivers can sometimes cause compatibility issues with your Chromebook’s camera. Ensuring that your Chromebook is running the latest version of Chrome OS and that your camera drivers are up-to-date can help resolve many camera-related problems.
- Camera Permissions: Like other applications, your Chromebook’s camera requires permission to access and utilize the camera hardware. If the camera permissions are not granted or have been revoked, you may encounter issues with the camera not working.
- Conflicting Extensions or Apps: Certain extensions or applications installed on your Chromebook may interfere with the camera’s functionality. These conflicts can arise due to resource usage, security settings, or compatibility issues.
- Hardware Issues: In some cases, the camera not working could be due to a hardware problem, such as a faulty camera module or a loose connection. While hardware issues are less common, they should not be ruled out, significantly if your Chromebook has been dropped or subjected to physical damage.
- Cache and Cookie Issues: Occasionally, cached data or cookies can cause conflicts with the camera, leading to functionality issues. Clearing the cache and cookies can help resolve these types of problems.
By understanding these potential causes, you can approach the troubleshooting process with a more targeted mindset, increasing your chances of resolving the “Chromebook camera not working” issue efficiently.
Basic troubleshooting steps
Before diving into more advanced troubleshooting methods, let’s start with some basic steps that can often resolve camera issues on your Chromebook. These initial steps are straightforward and can save time and effort if the problem is relatively simple.
- Restart your Chromebook: A simple restart can sometimes resolve temporary glitches or clear up any conflicts preventing the camera from working correctly. To restart your Chromebook, click on the system tray in the bottom-right corner of the screen, select the power icon, and choose “Restart.”
- Check Physical Connections: If your Chromebook has an external camera, ensure it is correctly connected to the device. Check for any loose or damaged cables, and reconnect the camera to a different USB port if possible.
- Close and Reopen Camera-using Apps: If you were using an application that requires camera access when the issue occurred, try closing and reopening the app. Sometimes, a temporary glitch or conflict within the app can cause the camera to malfunction.
- Check for Obstructions: Ensure that nothing is physically obstructing the camera lens. Dust, dirt, or other debris can block the camera’s view and prevent it from functioning correctly. Gently clean the camera lens with a soft, dry cloth.
If these basic troubleshooting steps do not resolve the issue, don’t worry – we have several more advanced methods to try. Proceed to the following sections for further troubleshooting techniques.
Updating Chrome OS and camera drivers
One of the most common causes of Chromebook camera issues is outdated software or drivers. Google regularly updates Chrome OS and its various components, including camera drivers, to address bugs, improve performance, and enhance security. Ensuring that your Chromebook is running the latest version of Chrome OS and that your camera drivers are up-to-date can often resolve camera-related problems.
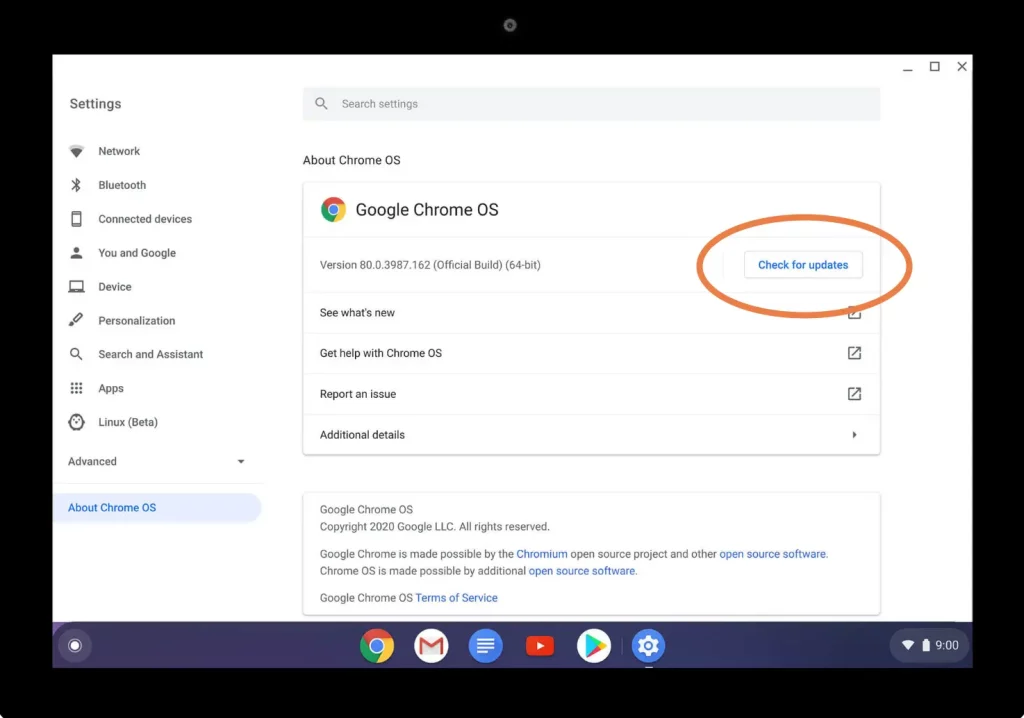
Here’s how you can update Chrome OS and your camera drivers:
- Update Chrome OS:
- Click on the system tray in the bottom-right corner of the screen.
- Select the “Settings” icon (gear-shaped).
- Scroll down and click on “About Chrome OS.”
- If an update is available, you’ll see an option to “Check for Updates” or “Update Now.”
- Follow the on-screen instructions to download and install the latest Chrome OS update.
- Update Camera Drivers:
- After updating Chrome OS, your camera drivers should also be updated automatically.
- However, if the issue persists, you can try manually updating the camera drivers by following these steps:
- Open the Chrome browser and navigate to chrome://components.
- Find the “Camera” component in the list and click the “Check for update” button.
- If an update is available, it will be downloaded and installed automatically.
Keeping your Chromebook up-to-date with the latest software and driver versions can resolve many issues, including camera-related problems. If the camera doesn’t work after updating, proceed to the next troubleshooting step.
Clearing cache and cookies
Sometimes, cached data or cookies can cause conflicts with the camera, leading to functionality issues. Clearing the cache and cookies can resolve these problems by removing any potentially corrupted or outdated data that may interfere with the camera’s operation.
Here’s how you can clear the cache and cookies on your Chromebook:
- Clear Browser Cache and Cookies:
- Open the Chrome browser on your Chromebook.
- In the address bar, type chrome://settings/clearBrowserData and press Enter.
- In the “Clear browsing data” window, select the time range for which you want to clear data (e.g., “Last hour,” “Last 24 hours,” “All time”).
- Check the boxes next to “Cookies and other site data” and “Cached images and files.”
- Click on the “Clear data” button.
- Clear App Cache:
- Open the Chrome browser and navigate to chrome://apps.
- Right-click on the app you used when the camera issue occurred and select “Remove from Chrome.”
- Confirm the removal by clicking “Remove” in the pop-up window.
- After removing the app, search for it in the Chrome Web Store and reinstall it.

By clearing the cache and cookies, you eliminate any potential conflicts or corrupted data that might be causing issues with the camera. This step can often resolve camera problems without needing more advanced troubleshooting methods.
Checking camera permissions
Like other applications, your Chromebook’s camera requires permission to access and utilize the camera hardware. If the camera permissions are not granted or have been revoked, you may encounter issues with the camera not working. Checking and adjusting the camera permissions can help resolve this problem.
Here’s how you can check and manage camera permissions on your Chromebook:
- Check Camera Permissions:
- Open the Chrome browser and navigate to chrome://settings/content/cameras.
- Under the “Camera” section, you’ll see a list of websites or apps requesting camera access.
- Ensure that the website or app you’re using is listed and the permission is set to “Allow.”
- Manage Camera Permissions:
- If the website or app is not listed, or if the permission is set to “Block,” you can add or modify the consent by following these steps:
- Click the “Add” button next to “Allow sites to access your camera.”
- In the pop-up window, enter the URL of the website or the name of the app you want to grant camera access to.
- Click “Add” to save the permission.
- If the website or app is not listed, or if the permission is set to “Block,” you can add or modify the consent by following these steps:
- Reset Camera Permissions:
- If you’re still experiencing issues after adjusting the camera permissions, you can try resetting them to their default state:
- Open the Chrome browser and navigate to chrome://settings/content/cameras.
- Scroll down and click on the “Reset permissions” button.
- Confirm the reset by clicking “Reset permissions” in the pop-up window.
- If you’re still experiencing issues after adjusting the camera permissions, you can try resetting them to their default state:
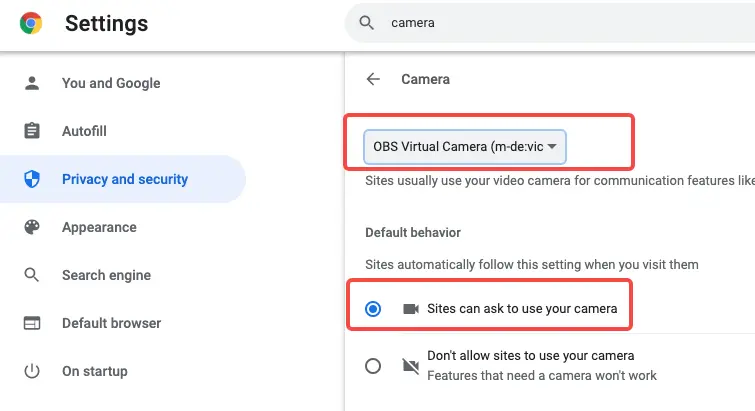
By ensuring that the necessary camera permissions are granted and properly configured, you can often resolve camera issues caused by permission-related problems.
Enabling the camera in Chrome settings
In addition to checking and managing camera permissions, you may need to enable the camera within the Chrome settings. Sometimes, the camera can be turned off or restricted due to security or privacy concerns, preventing it from functioning correctly.
Here’s how you can enable the camera in Chrome settings:
- Open Chrome Settings:
- Open the Chrome browser on your Chromebook.
- Click on the three-dot menu icon in the top-right corner of the browser window.
- Select “Settings” from the drop-down menu.
- Enable Camera Access:
- In the Chrome settings window, scroll down and click on “Privacy and security.”
- Under the “Permissions” section, click on “Site Settings.”
- Scroll down and click on “Camera.”
- Toggle the switch next to “Ask before accessing” to the on position.
- If the switch is greyed out, click the lock icon to the right and enter your Chromebook’s password to allow changes.
- Manage Camera Exceptions:
- While in the “Camera” settings, you can also manage exceptions for specific websites or apps.
- Click on the “Add” button next to “Allow” or “Block” to add exceptions for websites or apps that should always be allowed or blocked from accessing your camera.
By enabling camera access in Chrome settings and managing exceptions, you can ensure that your Chromebook’s camera is not inadvertently disabled or restricted, which could prevent it from functioning correctly.
Turning off conflicting extensions or apps
Specific extensions or applications installed on your Chromebook may interfere with the camera’s functionality. These conflicts can arise due to resource usage, security settings, or compatibility issues. Disabling or removing conflicting extensions or apps can help resolve camera-related problems.
Here’s how you can disable or remove potentially conflicting extensions or apps:
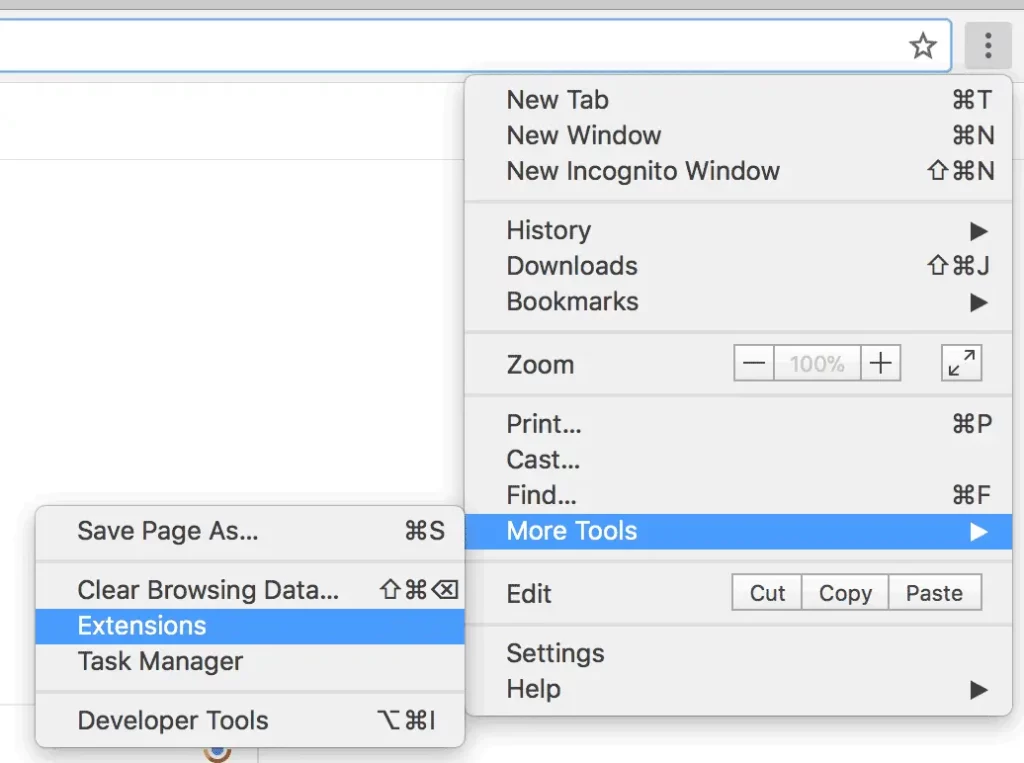
- Disable Chrome Extensions:
- Open the Chrome browser on your Chromebook.
- Click on the three-dot menu icon in the top-right corner of the browser window.
- Select “More tools” > “Extensions.”
- In the “Extensions” window, you’ll see a list of installed extensions.
- Toggle the switch next to each extension to turn it off temporarily.
- Restart your Chromebook and check if the camera issue is resolved.
- If the issue persists, you can remove the extensions by clicking the “Remove” button.
- Disable or Remove Apps:
- Open the Chrome browser and navigate to chrome://apps.
- Right-click on the app you suspect may be causing conflicts with the camera.
- Select “Remove from Chrome” to uninstall the app.
- Alternatively, you can turn off the app by clicking on the three-dot menu icon next to the app and selecting “Unpin” or “Remove from Desktop.”
- Restart your Chromebook and check if the camera issue is resolved.
By disabling or removing conflicting extensions or apps, you can eliminate potential sources of interference and resolve camera-related problems caused by software conflicts.
Performing a Powerwash
If none of the previous troubleshooting steps have resolved the “Chromebook camera not working” issue, you may need to consider performing a power wash. A Powerwash is a factory reset process that restores your Chromebook to its original state, removing all user data, settings, and installed applications.
While a Powerwash should be considered a last resort, as it will erase all your data and customizations, it can be an effective solution for resolving persistent hardware or software issues, including camera-related problems.
Here’s how you can perform a Powerwash on your Chromebook:
- Back-Up Your Data:
- Before performing a Powerwash, it’s crucial to back up any critical data, such as documents, photos, and other files.
- You can use cloud storage services like Google Drive or external storage devices to store your data safely.
- Initiate the Powerwash Process:
- Sign out of your Chromebook by clicking on the system tray in the bottom-right corner and selecting “Sign out.”
- After signing out, press and hold the Ctrl + Alt + Shift + r keys simultaneously.
- In the pop-up window, select “Restart.”
- Your Chromebook will restart and enter the Powerwash mode.
- Follow the on-screen instructions to complete the Powerwash process.
- Set Up Your Chromebook:
- After the Powerwash is complete, your Chromebook will be restored to its factory settings.
- You must set up your Chromebook as a new device, including signing in with your Google account and restoring your backed-up data.
By performing a Powerwash, you effectively reset your Chromebook to its original state, resolving any underlying software or configuration issues that may have been causing the camera to malfunction.
Contacting Chromebook support
If you’ve exhausted all the troubleshooting steps mentioned in this guide and your Chromebook camera still isn’t working, it’s time to consider contacting Chromebook support for further assistance. Sometimes, the issue may be related to a hardware defect or a more complex software problem that requires professional intervention.
Here’s how you can contact Chromebook support:
- Google Support:
- Visit the Google Support website and select your Chromebook model.
- Browse through the available troubleshooting articles and resources related to camera issues.
- If you can’t find a solution, click the “Contact Us” button to initiate a support request.
- Provide detailed information about the issue you’re experiencing, including any error messages or specific steps that cause the camera to malfunction.
- Manufacturer Support:
- You can also contact their support channels if your Chromebook was manufactured by a third-party company (e.g., Acer, ASUS, HP).
- Visit the manufacturer’s website and locate their support section.
- Look for options to submit a support ticket, initiate a live chat, or find contact information for their customer service representatives.
- Be prepared to provide your Chromebook’s model number, serial number, and any relevant details about the camera issue.
When contacting support, providing as much information as possible about the issue you’re experiencing is essential. This will help the support team better understand the problem and provide more effective solutions or troubleshooting guidance.
Additionally, if your Chromebook is still under warranty, you may be eligible for a repair or replacement, depending on the nature of the issue and the terms of your warranty.
Also Read: How to Add or Remove Google Chrome extension
Frequently Asked Questions
Q: Can a Chromebook camera stop working due to physical damage?
A: Yes, physical damage to the camera module or its connections can cause the camera to malfunction or stop working entirely. If your Chromebook has been dropped or subjected to impact, the camera hardware may have been affected.
Q: Is it possible to update the camera drivers on a Chromebook manually?
A: Yes, you can manually update the camera drivers on your Chromebook by navigating to chrome://components in the Chrome browser and checking for updates for the “Camera” component. However, it’s generally recommended to keep your Chromebook updated with the latest Chrome OS version, which should also automatically update the camera drivers.
Q: Can third-party apps or extensions cause camera issues on a Chromebook?
A: Absolutely. Third-party apps or extensions installed on your Chromebook can sometimes interfere with the camera’s functionality due to resource usage, security settings, or compatibility issues. Disabling or removing conflicting apps or extensions can often resolve camera-related problems.
Q: Is it safe to perform a power wash on my Chromebook?
A: A Powerwash is a factory reset process that restores your Chromebook to its original state, erasing all user data, settings, and installed applications. While it can be an effective solution for resolving persistent hardware or software issues, it’s essential to back up your data before performing a Powerwash, as all your files and customizations will be lost.
Q: Can I contact Chromebook support even if my device is out of warranty?
A: You can still contact Chromebook support for assistance even if your device is out of warranty. However, remember that you may be charged for any repairs or replacements required, as the warranty coverage will have expired.
Conclusion
This comprehensive guide provides various methods to resolve the “Chromebook camera not working” issue. It covers updating software and drivers, clearing cache and cookies, adjusting permissions, and turning off conflicting apps or extensions. Some methods may seem straightforward, while others, like performing a Powerwash, require more effort and preparation. If none of these methods resolve the camera issue, reach out to Chromebook support for their expertise and access to additional resources.
With the right troubleshooting approach, you can often get your Chromebook camera back up and running again, allowing you to leverage its capabilities for video conferencing and memory capture fully.
