10 Ways to Fix WiFi Connected but No Internet Access in Windows
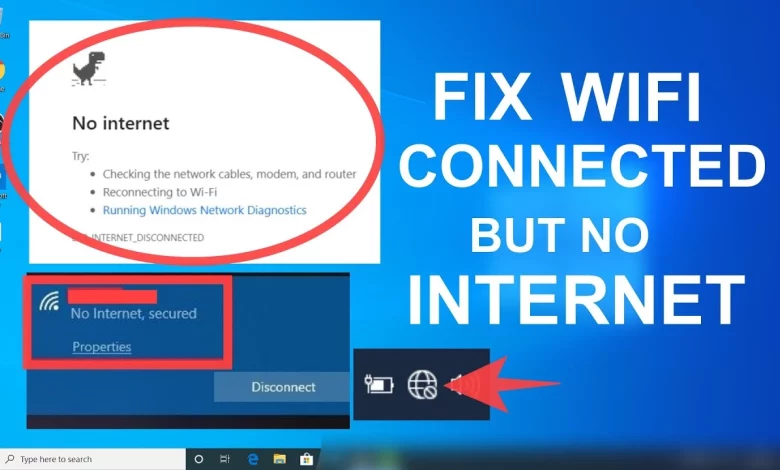
Understanding and resolving Fix WiFi Connected these connectivity issues is vital to ensuring that your online activities run smoothly without interruption. This blog post will explore ten effective solutions to troubleshoot and fix the problem when your WiFi is connected, but there is no internet connection. These methods are designed to help you quickly restore your internet access and get back to your online life with minimal disruption.
Table of Contents
Why is your WiFi connected but not having An Internet connection?
Network connection problems are more accessible than you think. Several factors make WiFi connection to the internet was unsuccessful, such as:
- IP address conflict.
- The WiFi router/modem has no WiFi.
- Anti-virus or Other Security Apps stop your internet connection.
- Overdue broadband tariff payment.
- The Network adapter is overdue.
- WiFi is turned off by default on your wireless router/modem.
The absence of network connectivity can be attributed to a myriad of factors, as delineated in this abridged compilation of prevalent network dilemmas encountered in various scenarios. Conflicts in IP addresses are the principal catalyst for WiFi connectivity devoid of network access. Subsequent sections will elucidate methodologies aimed at addressing and rectifying these typical causations.
Method 1: Reboot Your Computer and Router
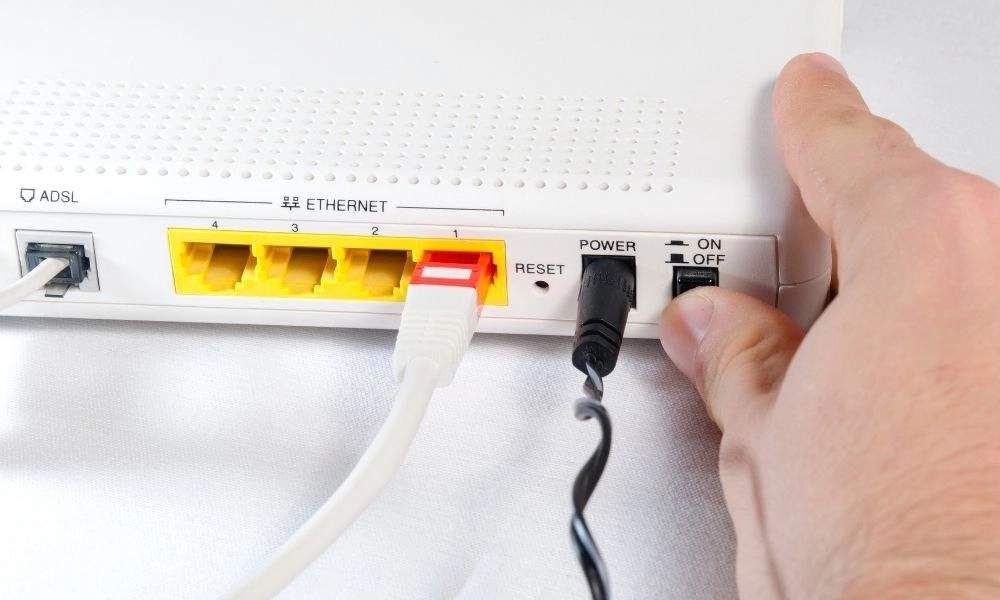
An excellent way to fix your router is to reboot it. While this may sound silly, a reboot can refresh the cache and fix many interconnected network and software problems. Rebooting your router will also allow your WiFi to reacquire an IP address, provided that you have automatically set up an IP address.
Steps to Reboot Your Computer:
- Open the Start Menu: Click on the Start menu at the bottom left corner of your screen.
- Access Power Options: Find and click on the Power button in the Start menu.
- Choose Restart: Select ‘Restart’ to reboot your computer. Wait for the system to shut down and restart automatically.
Steps to Reboot Your Router:
- Power Off: Locate the power button on your router or unplug it from the power source.
- Wait for a Minute: It’s often recommended to wait about one minute before turning the power back on. This waiting period ensures that the router’s memory is cleared.
- Power On: Turn the router back on by pressing the power button or plugging it into the power outlet.
Method 2: Update Network Adapter Drivers
Updating your network adapter drivers can be crucial for maintaining a stable and functional internet connection. Here’s a detailed guide on how to update your network adapter drivers using Windows Device Manager:
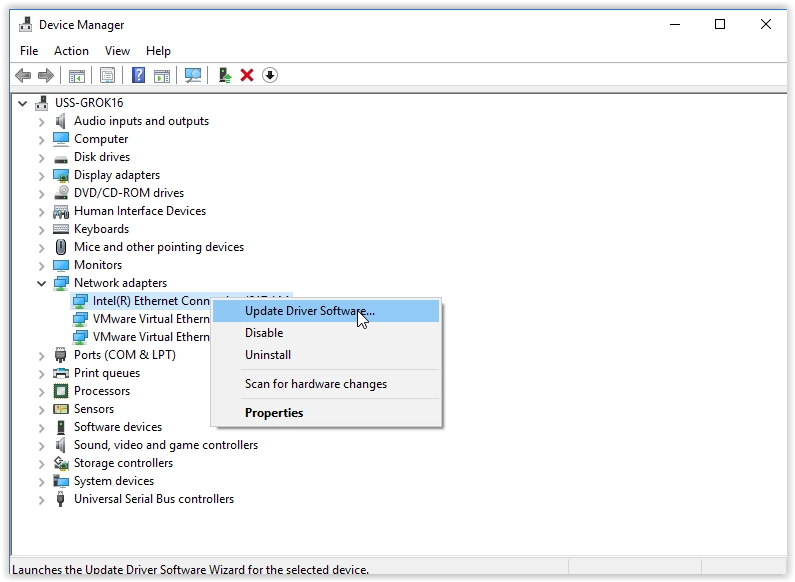
Steps to Update Network Adapter Drivers:
- Open Device Manager:
- Press the Windows key + R to open the Run dialogue box.
- Type devmgmt. msc and press Enter to open the Device Manager.
- Locate and Update Network Adapter:
- In the Device Manager window, expand the “Network adapters” section.
- Right-click on your WiFi controller (e.g., Broadcom, Intel) and select “Update driver” from the context menu.
- Search for Drivers Automatically:
- Choose “Search automatically for updated driver software.” Windows will search online for the latest drivers compatible with your network adapter.
- Automatic Driver Installation:
- Windows will automatically download and install the latest driver for your network adapter if an update is available.
- Reboot Your Computer:
- Once the driver update is complete, close all open windows and reboot your computer to ensure the new driver is applied correctly.
- Manual Driver Update:
- If the problem persists, repeat steps 1 and 2, but this time, choose “Browse my computer for driver software” after right-clicking your WiFi adapter.
- Select Driver Manually:
- Choose “Let me pick from a list of available drivers on my computer.” Make sure to select a driver that is compatible with your hardware.
- Check for Compatibility:
- When picking from a list, check the box for “Show compatible hardware” to display only the drivers compatible with your network adapter.
- Install from the Manufacturer’s Website:
- If updating through Windows does not resolve the issue, visit the manufacturer’s website to download and install the latest driver. Look for support or download sections on the site, and choose the driver that matches your network adapter model and your Windows version.
- Final Restart:
- After installing the new driver from the manufacturer’s website, restart your computer to ensure all changes take effect.
Method 3: Uninstall Wireless Drivers
Sometimes, the best way to fix persistent network issues is by uninstalling and reinstalling your wireless drivers. This method can resolve problems caused by corrupted or outdated drivers. Here’s how to correctly uninstall and reinstall your wireless drivers using Device Manager in Windows:
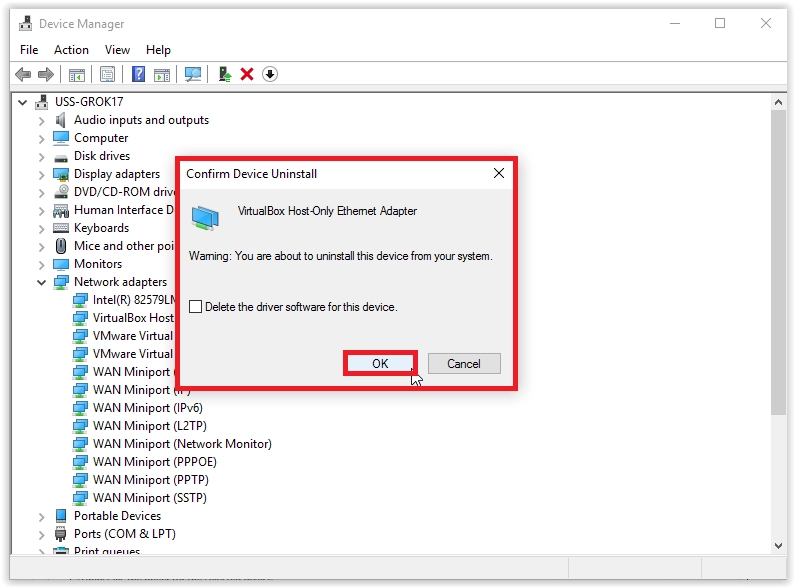
Steps to Uninstall and Reinstall Wireless Drivers:
- Open Device Manager:
- Press the Windows key + R to open the Run dialogue box.
- Type devmgmt. msc and hit Enter to launch the Device Manager.
- Uninstall the Wireless Network Card:
- Expand the “Network adapters” section.
- Right-click on your wireless network card and select “Uninstall device.”
- If prompted for confirmation, click “Yes” to proceed with the uninstallation.
- Scan for Hardware Changes:
- After the uninstallation, click on the “Action” menu at the top of the Device Manager.
- Select “Scan for hardware changes.” This action prompts the system to detect hardware without drivers and automatically reinstall the necessary drivers.
- Reconnect to Wireless Network:
- After the drivers are reinstalled, close the Device Manager.
- Go to your system’s network settings and reconnect to your wireless network.
- Disable and Enable the Wireless Adapter:
- Open the “Network and Sharing Center” by right-clicking the network icon in the system tray and selecting it from the context menu.
- Click on “Change adapter settings” on the left-hand side.
- Right-click on your Wi-Fi adapter and select “Disable.”
- Wait a few seconds, then right-click again and select “Enable.” This can help reset the network adapter’s settings.
- Troubleshoot Network Issues:
- Right-click on the network icon in the system tray again.
- Select “Troubleshoot problems” to run the Windows Network Diagnostics utility, which can automatically detect and attempt to fix network issues.
- Restart Your Computer:
- Finally, restart your computer to ensure all changes take effect and the system properly integrates the reinstalled drivers.
Method 4: Obtain IP Address and DNS Server Address Automatically
Configuring your computer to obtain an IP address and DNS server address automatically can resolve connectivity issues related to incorrect network settings. Here’s how to set your computer to receive these settings automatically:
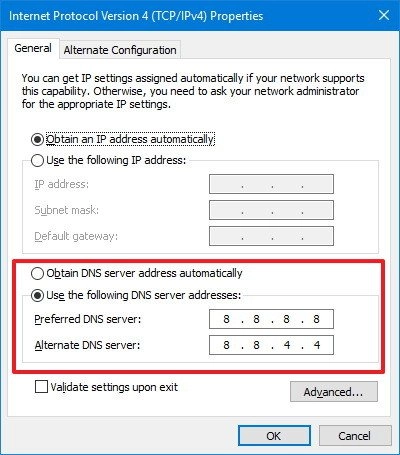
Steps to Set IP Address and DNS Automatically:
Open Network Settings:
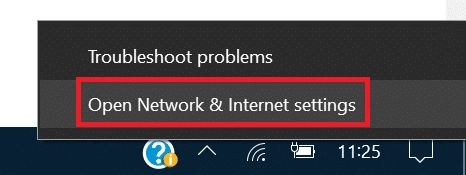
- Right-click the Network icon in the system tray (bottom-right corner of your screen).
- Select “Open Network & Internet Settings.”
Access Your Connection Settings:
- Click on your active network connection, usually labelled with the name of your wireless network.
Open Wi-Fi Status Window:
- In the network settings, click on “Wi-Fi” and then click on “Properties” under your active network name.
Configure IP and DNS Settings:
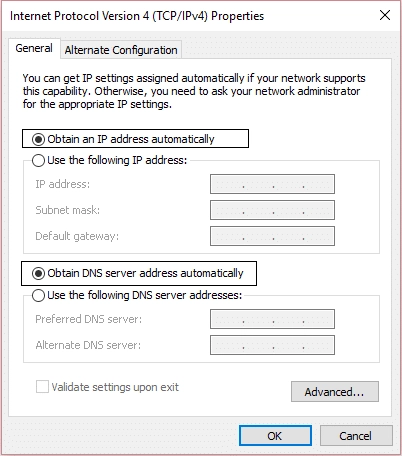
- Scroll down to “Internet Protocol Version 4 (TCP/IPv4)” and click on it.
- Click “Properties” to open the TCP/IPv4 properties dialogue.
Set to Obtain Automatically:
- In the “General” tab, check the boxes for “Obtain an IP address automatically” and “Obtain DNS server address automatically.”
Apply and Reboot:
- Click “OK” to apply the settings.
- Reboot your PC to ensure the new settings take effect.
Check Connectivity:
- After restarting, check if you can access the internet. If you are still experiencing issues, consider using alternative DNS settings.
Switching to Google DNS or OpenDNS:
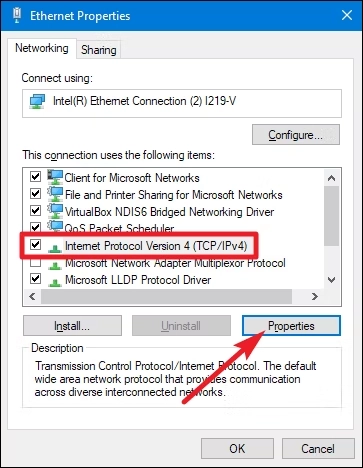
- If automatic settings do not resolve the issue, you can manually set your DNS to use Google DNS or OpenDNS, which might provide a more stable connection.
- To switch to Google DNS:
- Set the Preferred DNS server to 8.8.8.8
- Set the Alternate DNS server to 8.8.4.4
- To switch to OpenDNS:
- Set the Preferred DNS server to 208.67.222.222
- Set the Alternate DNS server to 208.67.220.220
- After entering these values, click “OK,” then restart your computer to apply these changes.
Method 5: Try Resetting TCP/IP or Winsock
Resetting the TCP/IP stack and Winsock can often resolve complex network issues related to connectivity or internet access problems. These resets restore the network settings to their default configuration, which can clear up conflicts caused by misconfigurations or software bugs. Here’s how to safely reset both TCP/IP and Winsock from the Command Prompt:
Steps to Reset TCP/IP and Winsock:
Open Command Prompt as Administrator:
- Right-click on the Start button (Windows icon), usually found at the bottom left corner of your screen.
- Select “Command Prompt (Admin)” or “Windows PowerShell (Admin)” if you do not see Command Prompt. This will open the terminal with administrative privileges.
Release, Flush, and Renew IP Configuration:
In the Command Prompt, type the following commands, pressing Enter after each one:
ipconfig /release
This command releases the current IP configuration.
ipconfig /flushdns
This command flushes the DNS resolver cache.
ipconfig /renew

This command renews the IP address with your DHCP server.
Reset Winsock and TCP/IP Stack:
- Open a new Command Prompt as Administrator if you closed the previous one.
- Type each of the following commands, pressing Enter after each:
netsh winsock reset
This command resets Winsock Catalog to a clean state or default configuration. Winsock settings are crucial for internet connections and this reset can resolve socket errors.
netsh int ip reset

This command resets TCP/IP stack to restore internet protocol settings to their default configuration.
Reboot to Apply Changes:
- Close the Command Prompt.
- Restart your computer to ensure all changes take effect. This reboot is crucial as it applies the reset settings to your network adapters.
Method 6: Enable WiFi from BIOS
If you’ve tried various methods to resolve a WiFi connectivity issue without success, the wireless adapter may be disabled from the BIOS (Basic Input/Output System). Enabling the WiFi adapter from the BIOS is a fundamental step that can sometimes be overlooked. Here’s how to check and allow your WiFi from the BIOS settings and what to do afterward:
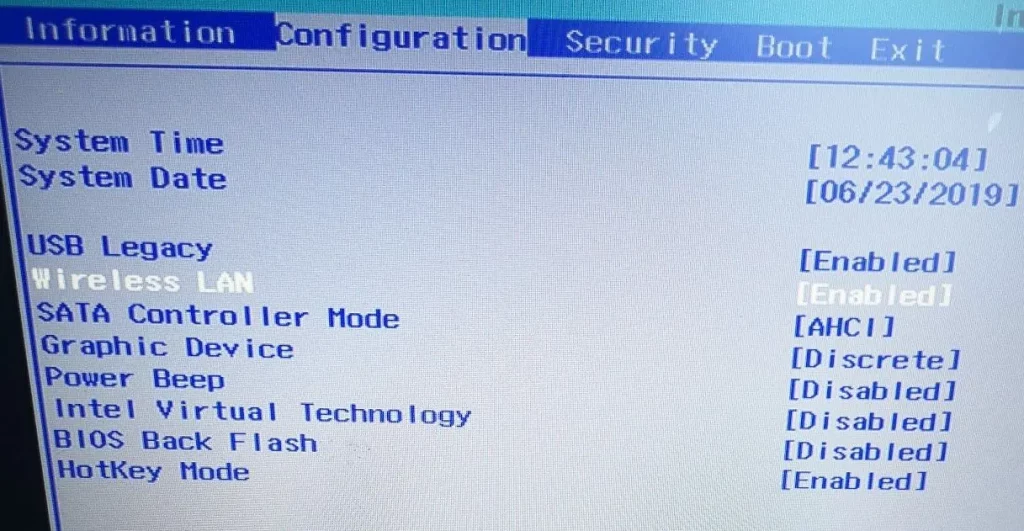
Steps to Enable WiFi from BIOS:
- Enter BIOS Settings:
- Restart your computer.
- Press the key that takes you into the BIOS settings during the initial boot phase. This key is usually displayed on the screen during the boot process and is often either Del, F2, F10, F12, or Esc. The exact key can vary depending on your computer’s manufacturer.
- Locate Wireless Settings:
- Once inside the BIOS, navigate through the menus using the arrow keys. Look for sections like “Advanced,” “Hardware,” or “Integrated Peripherals.”
- Find settings related to wireless or network capabilities. The option may be named something like “Wireless LAN,” “WLAN,” or “WiFi Adapter.”
- Enable WiFi Adapter:
- If the wireless adapter is disabled, you must change the setting to enabled. Use the keys specified in the BIOS (often Enter to select and +/- or arrow keys to change options).
- Save and Exit BIOS:
- After enabling the wireless adapter, be sure to save your changes. You can typically do this by pressing F10 to save and exit, or you may need to navigate to an “Exit” menu and select “Save Changes and Reset” or something similar.
- Confirm any prompts to save the settings and reboot.
- Check WiFi in Windows Mobility Center:
- Once your computer boots into Windows, go to the Control Panel.
- Select “Hardware and Sound” and click “Windows Mobility Center.”
- Look for the wireless network section in the Mobility Center. You should now be able to turn the wireless adapter ON/OFF from here.
- Troubleshoot Connectivity Issues:
- If enabling the WiFi adapter from BIOS did not resolve the issue, you might need to update the wireless drivers.
- You can update drivers through Device Manager by right-clicking on your wireless adapter and selecting “Update driver” or downloading the latest drivers directly from the manufacturer’s website.
Method 7: Edit Registry Key to Enable Active Probing
Editing the Windows Registry to enable active probing can help resolve issues where your PC is connected to WiFi but has no Internet access. Active probing allows Windows to detect network connectivity status more accurately. Here’s how to safely modify the Registry to enable this setting:
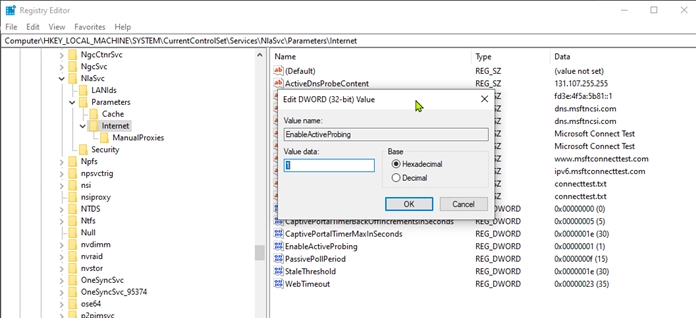
Steps to Edit the Registry for Network Connectivity:
Open Registry Editor:
- Press
Windows key + Rto open the Run dialog box. - Type
regeditand hitEnter. This will launch the Registry Editor. - If prompted by User Account Control (UAC), click “Yes” to proceed.
Navigate to the Correct Registry Key:
- In the Registry Editor, navigate to the following key:
HKEY_LOCAL_MACHINE\SYSTEM\CurrentControlSet\Services\NlaSvc\Parameters\Internet

You can copy and paste the above path into the address bar of the Registry Editor for quicker navigation.
Modify the EnableActiveProbing Key:
- Look for the EnableActiveProbing entry within the Internet key. If it exists, double-click on it to modify its Value.
- If it does not exist, you will need to create it:
- Right-click the Internet key, select New > DWORD (32-bit) Value, and name it EnableActiveProbing.
- Set the Value data to 1 and ensure the base is set to Hexadecimal.
- Click OK to save the changes.
Reboot Your PC:
- Close the Registry Editor.
- Restart your computer to apply the changes. This reboot is crucial as it allows Windows to recognize the changes and implement the new network probing settings.
Important Safety Tips:
- Backup the Registry: Before making any changes, it’s a good idea to back up the Registry. You can do this by clicking File > Export in the Registry Editor and saving a copy of the current state. If anything goes wrong, you can restore the Registry by clicking File > Import and selecting your backup file.
- Be Cautious: Be very careful when editing the Windows Registry. Incorrect changes can cause system instability or even prevent Windows from booting.
Method 8: Disable Proxy Settings
Disabling proxy settings can help resolve issues where your computer is connected to WiFi, but there’s no internet access, especially if your network isn’t supposed to use a proxy server. Incorrect proxy settings can redirect internet traffic improperly, leading to connectivity issues. Here’s how to turn off proxy settings in Windows:
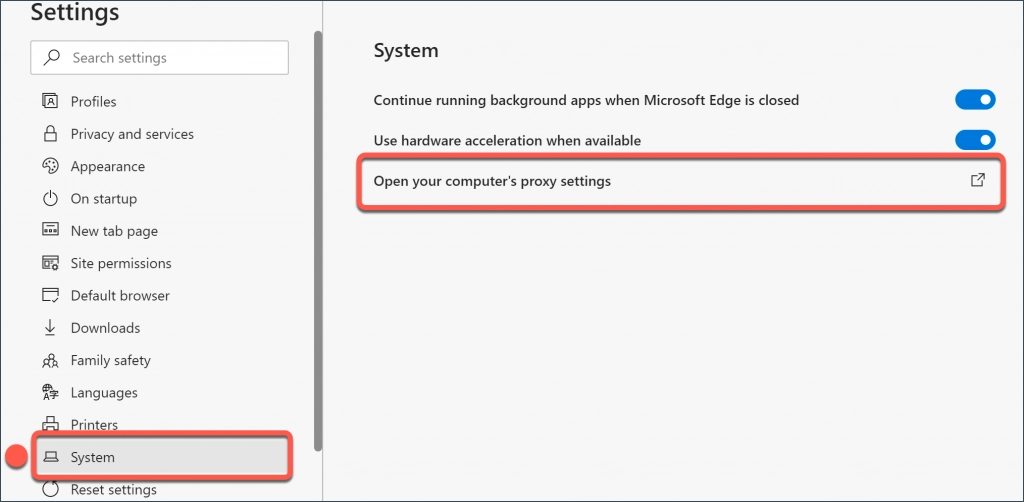
Steps to Disable Proxy Settings:
- Open Internet Options:
- Press the Windows key and type “internet options” or “internet properties” in the search bar.
- Click on “Internet Options” from the search results. This will open the Internet Properties window.
- Navigate to LAN Settings:
- Go to the “Connections” tab located at the top of the Internet Properties window.
- Click on “LAN settings” at the bottom of the tab. This opens the Local Area Network (LAN) Settings dialog.
- Adjust Proxy Settings:
- Ensure that the “Automatically detect settings” option is checked in the LAN Settings dialog. This allows Windows to detect the necessary network settings automatically.
- If the “Use a proxy server for your LAN” option is checked, uncheck it. This will disable any proxy settings that may be interfering with your internet connection.
- Apply Changes:
- Click “OK” to close the LAN Settings dialog.
- Click “Apply” to save your changes in the Internet Properties window and then “OK” to close the window.
- Reboot Your PC:
- Restart your computer to ensure that the changes take effect. A reboot is essential as it allows the system to re-establish network connections without the proxy settings.
Method 9: Run Network Troubleshooter
The Windows Network Troubleshooter is a powerful tool designed to diagnose and automatically resolve various network connectivity issues, including cases where your WiFi is connected without internet access. Here’s how you can utilize this built-in troubleshooter to fix your network issues potentially:
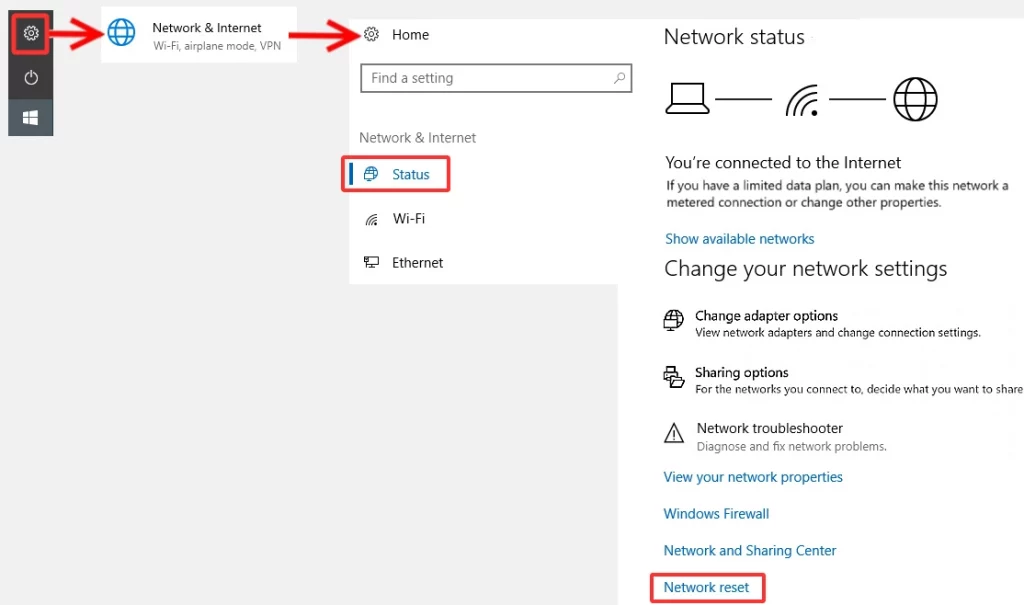
Steps to Run Network Troubleshooter:
- Open Windows Settings:
- Press the Windows Key + I to open the Settings window.
- Click on “Update & Security,” typically located towards the bottom of the Settings menu.
- Access the Troubleshoot Menu:
- From the left-hand menu, select “Troubleshoot.”
- This section is dedicated to resolving various system issues through automated processes.
- Run the Internet Connections Troubleshooter:
- Within the Troubleshoot menu, click on “Additional troubleshooters.”
- Here, you will find various troubleshooters for different components. Click “Internet Connections” and then “Run the troubleshooter.”
- Follow the on-screen instructions. The troubleshooter will attempt to identify and resolve any issues related to your internet connectivity.
- Check for Network Adapter Issues:
- If running the Internet Connections troubleshooter doesn’t resolve the problem, return to the “Additional troubleshooters” section.
- Find and click on “Network Adapter.” Then, click “Run the troubleshooter.”
- This will initiate a more specific diagnosis targeting your network adapters, addressing issues like outdated drivers or misconfigurations.
- Reboot Your PC:
- After completing the troubleshooting processes, reboot your computer.
- A restart will ensure that any fixes the troubleshooters apply are fully integrated into your system operations.
Additional Tips:
- Follow All Prompts: During troubleshooting, you might be prompted to make decisions or approve fixes. Carefully read each prompt to understand what changes the troubleshooter intends to make.
- Administrator Access: Running troubleshooters with administrator privileges can sometimes provide more comprehensive fixes. Right-click the Start button, select “Command Prompt (Admin)” or “Windows PowerShell (Admin),” and run the troubleshooter commands from there if needed.
- Update Your System: Ensure your Windows OS is up to date. Updates can include essential fixes for network functionality that might resolve your issue without additional troubleshooting.
Method 10: Reset Your Network
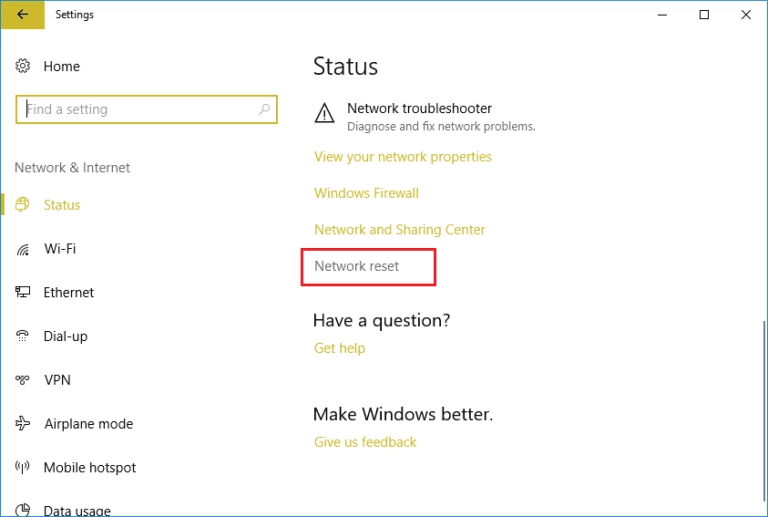
1. Press Windows Key + I to open Settings then click on Network & Internet.
2. From the left-hand menu select Status.
3. Now scroll down and click on Network reset at the bottom.
4. Again click on “Reset now” under Network reset section.
5. This will successfully reset your network and once it is complete the system will be restarted.
Related Post : A Guide to Saving Your Bandwidth in Windows 10
Frequently Asked Questions (FAQs)
Q1: What does it mean when my device is connected to WiFi without the Internet?
- Answer: This means that your device has successfully connected to your router or access point but cannot access the Internet. This issue can be caused by various factors, including router or modem problems, IP conflicts, or issues with your Internet Service Provider (ISP).
Q2: Why is it essential to resolve WiFi connectivity issues?
- Answer: Resolving these issues is crucial for uninterrupted work and leisure activities. A stable internet connection is essential for productivity, communication, entertainment, and accessing vital online resources.
Q3: How can restarting my wireless router help resolve network issues?
- Answer: Restarting your router can clear temporary glitches and refresh the connection between your router and ISP. This simple step often resolves many network issues by re-establishing the connection.
Q4: What should I look for in my modem lights to diagnose connectivity issues?
- Answer: Modem lights can indicate the status of your internet connection. Typically, there should be a solid light for power, a solid or blinking light for internet connectivity, and other lights indicating activity. Unusual patterns, like a blinking red light, can indicate a problem.
Q5: How do I use the network troubleshooter in Windows?
- Answer: You can access the network troubleshooter by going to Settings > Update & Security > Troubleshoot. Select “Internet Connections” and click “Run the troubleshooter.” Follow the on-screen instructions to diagnose and fix the issue.
Q6: Can antivirus or security applications interfere with my internet connection?
- Answer: Yes, sometimes antivirus or security applications can block internet access. Temporarily turning off these applications can determine if they cause the issue.
Q7: How do I change my router’s wireless mode, and why would I need to?
- Answer: Access your router settings via a web browser by entering the router’s IP address. Navigate to the wireless settings section and change the wireless mode. Different modes (e.g., 802.11n, 802.11g) can offer better performance depending on your devices.
Q8: When should I reset my wireless router, and how do I do it?
- Answer: Resetting your router can be necessary when other troubleshooting steps fail. To reset, find the reset button on your router, press and hold it for about 10 seconds, then release it. This will restore the router to factory settings, so you must reconfigure it.
Q9: How can I check if my ISP is causing the connectivity issue?
- Answer: Check your ISP’s website or contact their customer service to see any outages or maintenance activities. You can also check for expired services by logging into your account on the ISP’s website.
Q10: What are the steps to update my wireless network adapter driver?
- Answer: Open Device Manager, expand the “Network adapters” section, right-click your wireless adapter, and select “Update driver.” Choose to search automatically for updated driver software. If this doesn’t work, download the latest driver from the manufacturer’s website.
Conclusion
Maintaining a stable internet connection is essential for work and leisure in our increasingly digital world. When faced with the frustrating issue of being connected to WiFi without internet access, it’s necessary to troubleshoot and resolve the problem systematically. You can restore your internet connection by understanding the potential causes—from IP conflicts to router settings—and applying the methodical solutions outlined in this guide.


